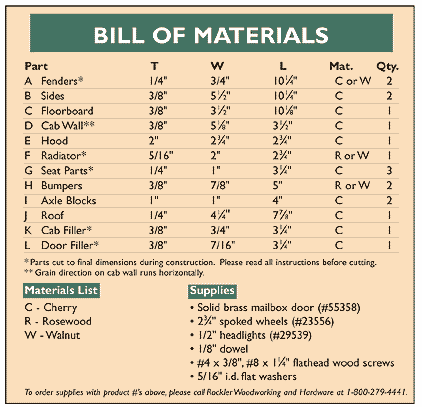
|
Add the
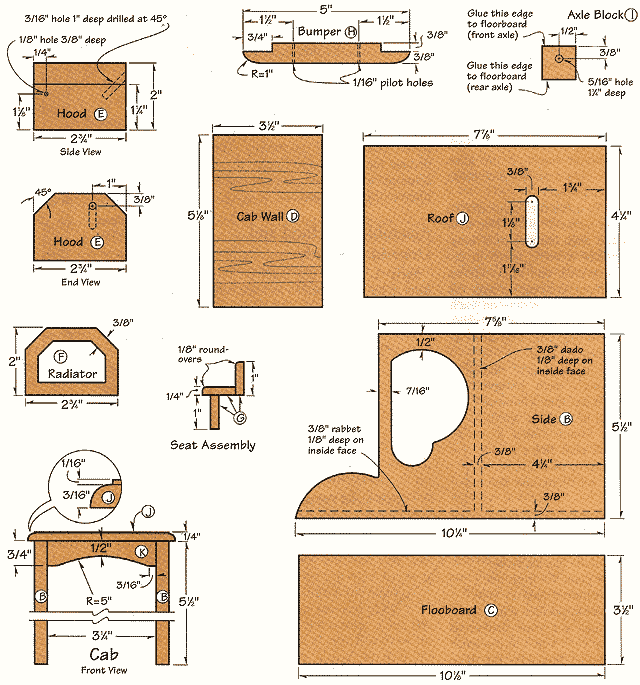
Seats, Bumpers and Axle Blocks
Step 1. To
make the seat parts, cut a 12" strip of 1/4" x 1" stock. We chose
cherry, but walnut works well also. Cut a 4" strip from the blank,
and set it aside for the seat base. Rout a 1/8" roundover along one
edge of the remaining blank, and use it for the seat bench and back.
Step 2. Measure the cab interior, then cut the three seat parts
1/8" too long. Using a stopblock on your miter-gauge extension, trim
the parts to fit snugly. Next, glue the seat base to the bench and
the bench to the back where shown on the
Seat Assembly drawing. Apply glue to the cab wall and to the
bottom edge of the seat base, then maneuver the assembled seat into
position without smearing the glue.
Step 3. Cut each
bumper to dimension (we used rosewood), then bandsaw a 3/8" x 3/4"
notch in the back edge at each end where shown on the Bumper
drawing. Lay out a 1" partial radius on each end of the front
edge, then sand these radii to the line. Drill two 1/16" shank holes
through each bumper. Center and glue a bumper to each end of the
floorboard. Using the shank holes as guides, drill pilot holes into
the floorboard. Now, drive 1-1/4" brads, set them, and fill the
holes.
Step 4. Crosscut two 4" long axle blocks. On
one end of the blocks, locate and mark a point 3/8" from one edge
and centered side to side. Use this point to position a tall fence
and stopblock on your drill-press table. Clamp each block to the
fence and stopblock. Meas-ure the true diameter of your axle pegs,
then drill an axle-peg hole 1-1/4" deep in both ends.
Step 5. After youÆve positioned the wheels
vertically, place the body on a work table that allows you to view
it from both sides without moving it.Set the body on the assembled
blocks and wheels, then maneuver the wheels to center them
horizontally in the wells. Now, adjust the wheels on the opposite
side to center them. Then make a pencil mark on the floorboard along
one edge of each block. Turn the body upside down, and use a try
square to scribe a perpendicular line at each pencil mark. Align the
blocks with these lines. Center them from side to side, then glue
and clamp them to the floorboard.
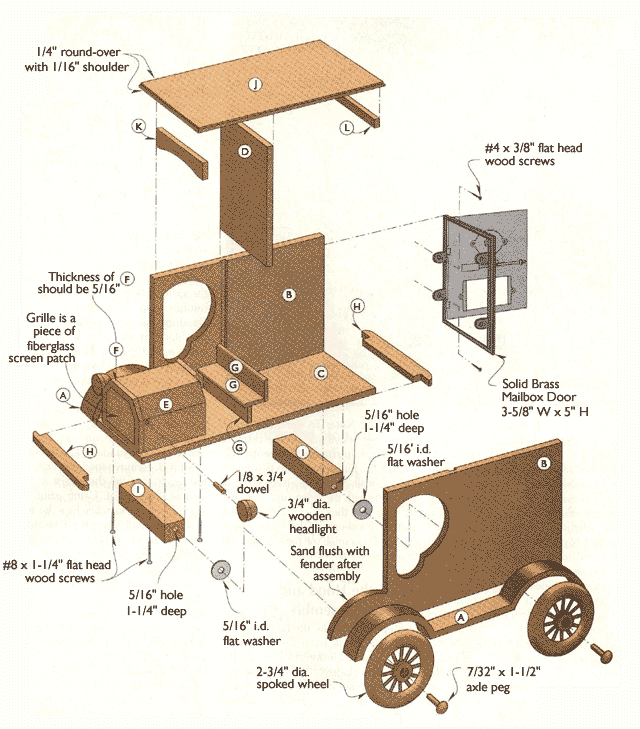
Assemble the Hood and
Door to the Body
Step 1. Center the hood on the front
of the floorboard so its back end is flush with the back edge of the
cab posts. Make faint pencil marks to mark this location, then
temporarily adhere the hood to the floorboard with double-faced
tape. Drill and countersink four shank and pilot holes Ś two in
front of the axle block, two behind it Ś through the bottom face.
Remove the hood, peel off the tape, and set the hood aside for now.
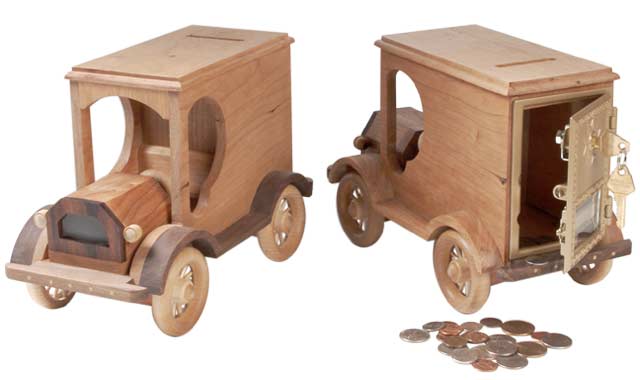
Step 2. Position the mailbox door in the back opening
with its bottom edge resting on the bumper. Mark the four screw-hole
locations for the mounting brackets with a short pencil. We found it
necessary to ōdrillö holes using the #4 x 3/8" screws themselves,
which is not an elegant solution. However, the mounting brackets on
the door will conceal any tear-out.
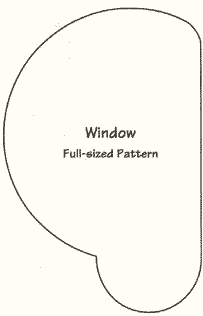
Make the Roof, then
Add the Coin Slot
Step 1. Rip and crosscut the roof to
dimension. Using a 1/4" roundover bit, rout the ends and then the
edges. Lay out the coin slot where shown on the Roof drawing.
Using a fence on your drill-press table, drill overlapping 3/8"
holes to rough out the slot. File or scrollsaw the slot edges flat.
Now, finish sand the roof.
Step 2. Center the roof on
top of the body, then mark its location faintly on the underside.
Apply glue to the top edges of the body, position the roof, then
gently clamp.
Step 3. To make the cab and door
fillers, cut a 3/8" x 3/4" x 12" blank. Then crosscut a 31/2" long
piece for the cab filler; trim it to fit snugly between the top
front ends of the cab. Next, lay out a 5" radius arc on the bottom
edge, centering it 3/16" from either end. Sand the arc to shape.
Now, finish sand the cab filler, then glue and clamp it to the
underside of the roof.
Finish and Final Assembly
Step 1. Apply a hardening oil finish to the truck, hood
assembly, wheels and axle-peg heads. Wipe off the excess according
to the manufacturerÆs instructions, then repeat. After the second
coat has dried overnight, apply a coat of paste wax to the exterior
surfaces.
Step 2. Attach the floorboard using flathead
wood screws. Next, mount the door in its opening. Fit each wheel
with an axle peg and washer, then drive the pegs into their holes in
the axle blocks. Check the action to make sure the wheels turn
freely but donÆt wobble.
|