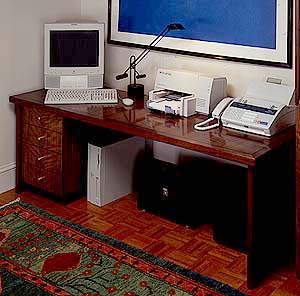
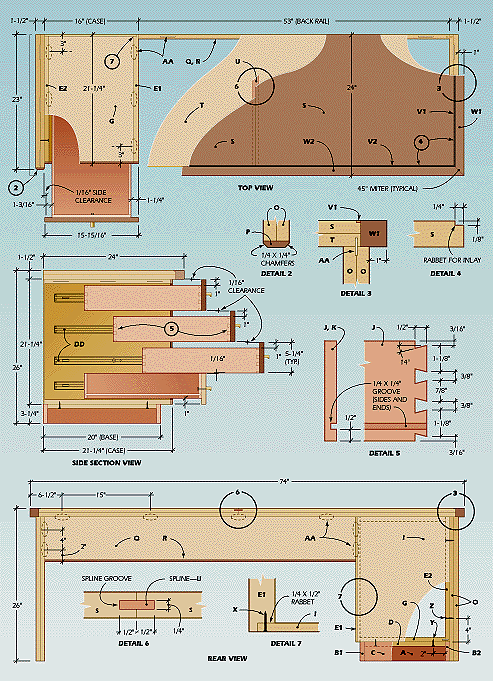
OFFICE CREDENZA
BY NEAL BARRETT
Technical Art by Eugene Thompson, Photos by John Griebsch

While we designed this work center to complement our executive desk, with four drawers and just over 12 sq. ft. of work surface, it's a handsome and functional desk in its own right. This elegant piece is ready to tackle your basic storage needs and hold your personal computer (and fax machine)–with enough room left over to handle all the paperwork on your busiest days.

The crossgrain walnut top with black inlay is the signature of a high-end custom piece, as are the solid-maple dovetailed drawers on full-extension slides. As with the main desk, we used walnut-veneer MDF (medium-density fiberboard). Order the stock "sequence matched and numbered" so that you can piece panels together to the best effect. Because veneer matching plays a major part in the overall appearance of the finished piece, it's important to carefully plan your material use with this detail in mind.

The Drawer Case

Begin by cutting the case parts (E1, E2, G) to size. Cut edge band strips (F) from solid walnut and glue them to the front edges of the panels. Use a router with an edge guide to cut the rabbet along the back edge of the exposed side of the base.

Lay out the joining-plate slots in the case parts and use a plate joiner to cut the slots. Apply glue to the slots and joining plates, install the plates and assemble the case. Use bar or pipe clamps to pull the joints tight and check that the assembly is square by comparing opposite diagonal measurements. Adjust the clamps if necessary and allow the glue to cure for at least 30 minutes before removing the clamps. Cut the 1/4-in. back panel (I) to size, bore pilot holes and install it on the case with 3/4-in. No. 5 fh wood screws.

Cut solid-maple stock to size for the base (A, B1, B2, C), and cut the 3/4-in. plywood base top panel (D) to size. Join the maple pieces to the panel and to each other at the corners with 4d finishing nails and glue. Make sure that the miter joint on the exposed corner is tight. Set and fill the nail holes. When the filler is completely dry, sand the base smooth with 120-, 180- and 220-grit sandpaper. Bore pilot holes in the base top and fasten the base to the case.

The Legs And Rail

Cut walnut panels to size for the legs (O). Apply glue to a pair of panels for each leg, then clamp them together until the glue sets. Cut a walnut edge band (F) for each leg assembly. Apply glue to one of the strips and the front edge of one of the legs, then clamp the strip in place. Repeat for the other leg. After the glue sets, scrape off any excess. Use a router and chamfer bit to cut the bevels along the front edges of the legs.

Cut the back rail to size and glue the walnut edge band (R) along its bottom edge. Lay out and cut the joining-plate slots in the ends and top edge of the rail and also in the leg panels and inner case side. Set these parts aside until the top is complete.

The Top

Cut the panels to size for the desktop. The top is formed by sandwiching together two pieces of 3/4-in. stock. The grain of the top panel (S) runs across the top, so the upper panels must be joined in the center. Pay close attention to matching the grain. Since the bottom panel (T) is not visible, cut it in one piece with the grain running along its length.

Use the router with a slotting cutter to cut the spline grooves in the mating edges of the top panels. Cut a maple spline to fit the groove, apply glue to the grooves, edges and spline and assemble the panel. Pull the joint tight with clamps and allow the glue to set. Spread glue on the desktop panels and stack them together with all edges perfectly flush. Use enough clamps and cauls to distribute even pressure across the top. Let the glue set for at least 1 hour.

Use a router and edge guide to cut the rabbet around the front and ends of the top. Trim the black inlay strips (V1, V2) to size. Since the strips come in 3-ft. lengths, there will be joints along the front edge of the top. To keep these seams hidden, use 45 degree scarf joints instead of butt joints. Apply glue to the rabbet and install the inlay strips. Use masking tape spaced 2 in. apart to hold the inlay while the glue sets. After 30 minutes, remove the tape and scrape off excess glue.

Cut the solid-walnut edge (W1, W2) to size from 2-in. stock. Spread glue on both the panel edge and one of the solid edge pieces, and clamp the piece in place. Be sure to keep the top surfaces of the veneered panel and walnut edging perfectly flush. Repeat the process for each edge.


Нажмите для увеличения
 
ASSEMBLY DRAWING

Нажмите для увеличения
 
DETAILS DRAWING

Assembly

Lay out the joining-plate slots on the bottom side of the desktop and use the plate joiner to cut the slots. Sand the desk parts with 120-, 180- and 220-grit sandpaper.

Spread glue in the joining-plate slots at the ends of the back rail and in the mating slots at the case and right leg. Spread glue on the joining plates, install the plates and join the rail to the case and leg. Use bar clamps to pull the joints tight. While the glue sets, bore and countersink pilot holes through the left case side to attach the left leg and fasten the leg with screws.

Apply glue to the slots in the desktop and on the top edges of the base parts. Spread glue on the joining plates, install them and place the top on the base. Be sure to use pads under the clamp jaws when pulling the joint tight.

Drawer Construction

Cut maple to size for the drawer parts. We used a Leigh dovetail jig and a router to cut the drawer joints. If you use another type of jig, or decide to cut the joints by hand, the layout may vary. Follow the directions that come with your jig for cutting the joints.

Use a dado blade in the table saw to cut the drawer-bottom grooves in the other drawer parts. Cut the bottoms from 1/4-in. maple or birch plywood. Sand the inside surfaces of each drawer part with 120-, 180- and 220-grit sandpaper, but be careful to not sand the joint surfaces or the dovetails will not fit properly.

Use a small brush to spread glue on the dovetail-joint surfaces, then assemble one of the sides to a front and back. Slide the drawer bottom into position, then join the remaining side. If the joints fit properly, you will not need to clamp the drawer together. Just compare opposite diagonal measurements to be sure that the drawer is square and set it aside until the glue sets. When the glue is fully cured, sand the exterior of all drawers.

Cut the drawer faces from a single walnut panel so the grain will run continuously when the drawers are in place. Number the faces on the back side so that you can keep them in the proper order and apply walnut-veneer tape on all edges. The tape comes with hot-melt glue applied to its back side so you can use a household iron to adhere it.

Sand the drawer faces, then attach them to the drawer boxes with 1-in. No. 8 screws. Note that the position of the bottom face, relative to the drawer box, is different from that of the other faces. Install the drawer slides according to the instructions that come with them. Bore pilot holes for the drawer pulls and install them with the appropriate screws.

Remove the drawers and sand the credenza to eliminate any scuffs and scratches and thoroughly remove all dust. Wipe all surfaces with a tack cloth.

Finishing

First, finish the case base by applying two or three coats of satin black enamel. Lightly sand between coats to ensure a smooth surface.

Apply Behlen's Pore-O-Pac (Van Dyke Brown) paste wood filler to the top using a brush or rubber squeegee. Spread the filler across the grain, then re-apply it with the grain. When the paste takes on a dull appearance, remove the excess with a plastic scraper, then buff the surface vigorously with burlap cloths. Let the top dry overnight before proceeding.

Use three coats of Behlen's Rockhard Table Top Varnish for the final finish. Thin the first coat 20% with Rockhard Varnish Reducer. After 12 hours drying time, lightly sand the surface with 400-grit paper and wipe with a tack cloth. Apply two more coats, allowing overnight drying and light sanding between coats.

Let the final coat cure for no longer than 20 hours, then wet-sand the surface with 600-grit paper and paraffin oil. When all dust and uneven spots are gone, wipe the surface with a soft cloth to remove the oil and slurry. Use No. 0000 steel wool to burnish the surface, then polish the desk with a soft, lint-free cloth.


MATERIALS LIST–CREDENZA

Key
No.
Size and description (use)
A
1
3/4 X 3-1/4 X 15-1/4" maple†† (base front)
B1
1
3/4 X 3-1/4 X 20" maple†† (base right side)
B2
1
3/4 X 3-1/4 X 19-1/4" maple†† (base left side)
C
1
3/4 X 3-1/4 X 13-3/4" maple†† (base back)
D
1
3/4 X 13-3/4 X 18-1/2" panel stock** (base top)
E1
1
3/4 X 21-1/4 X 20-7/8" walnut panel stock* (case right side)
E2
1
3/4 X 21-1/4 X 20-5/8" walnut panel stock* (case left side)
F
2
3/8 X 3/4 X 21-1/4" walnut (edge band)
G
2
3/4 X 14-1/2 X 21-3/8" panel stock** (case top/bottom)
H
2
3/8 X 3/4 X 14-1/2" walnut (edge band)
I
1
1/4 X 15-3/4 X 21-1/4" plywood (case back)
J
8
1/2 X 4-1/4 X 20" maple (drawer side)
K
8
1/2 X 4-1/4 X 13-1/2" maple (drawer end)
L
4
1/4 X 13 X 19-1/2" maple plywood (drawer bottom)
M
4
3/4 X 5-1/4 X 15-15/16" walnut panel stock*††† (drawer front)
N
as reqd.
walnut veneer tape
O
4
3/4 X 22-5/8 X 24-1/2" walnut panel stock* (leg panel)
P
2
3/8 X 1-1/2 X 24-1/2" walnut (edge band)
Q
1
3/4 X 7-5/8 X 53" walnut panel stock* (rail)
R
1
3/8 X 3/4 X 53" walnut (edge band)
S
2
3/4 X 22-1/2 X 35-1/2" walnut panel stock* (upper top panel)
T
1
3/4 X 22-1/2 X 71" panel stock** (lower top panel)
U
1
1/4 X 1 X 22-1/2" maple (spline)
V1
2
1/8 X 1/4 X 22-1/2" maple† (inlay)
V2
1
1/8 X 1/4 X 71" maple† (inlay)
W1
2
1-1/2 X 1-1/2 X 24" walnut (edge)
W2
1
1-1/2 X 1-1/2 X 74" walnut (edge)
X
as reqd.
3/4" No. 5 fh wood screw**
Y
as reqd.
1-1/4" No. 8 fh wood screw**
Z
as reqd.
1-1/2" No. 8 fh wood screw**
AA
as reqd.
No. 20 joining plate**
BB
as reqd.
4d finishing nail**
CC
4
drawer pull–Sugatsune No. GLA-16, polished brass
DD
4
20" full-extension drawer slide–No. 32839 ††††

*Walnut-veneer MDF or veneer-core panel
**Walnut-, maple- or birch-veneer MDF or veneer-core panel (plywood)
† Black-dyed inlay strips available from Dover Inlay Mfg. Co. Inc., Box 151, Williamsport, MD 21795
†† Painted black
††† Dimension includes walnut veneer-tape edge
†††† Available from The Woodworkers' Store, 21801 Industrial Blvd., Rogers, MN 55374.
Misc: Glue; 120-, 180,- 220- and 400-grit sandpaper; 600-grit waterproof paper; Behlen's Pore-O-Pac paste wood filler (Van Dyke Brown) No. B744-IF346; Behlen's Rockhard Table Top Varnish No. B603-28507; Behlen's Rockhard Varnish Reducer; black satin enamel paint
Hardware manufacturer address: Sugatsune America Inc., 221 E. Selandia Ln., Carson, CA 90746

Hosted by uCoz