This traditional-looking
storage table keeps your CDs and tapes out of sight, but
at the same time makes them easily accessible.
Electronic entertainment media are everywhere these
days. Cassette recorders, VCRs, and DVD and CD players
have changed the way we enjoy our leisure time. These
devices provide an almost unlimited selection of
enriching and entertaining pursuits. Unfortunately, the
more we use them, the more storage space we need. Most
entertainment-center cabinets provide for some storage,
but often this space is insufficient.
To address this need, we designed a small side table
with three drawers sized specifically for these items.
The table has a traditional style that can fit in a
variety of room settings. And it's proportioned to serve
as a lamp table, end table or night stand.
It also has the advantage of being quite easy to
build. It has a minimum of parts, and its joinery is
extremely basic. You should be able to complete it in
three or four weekends, and still have time to mow the
lawn or take a well-deserved nap.
We built our table from solid mahogany and mahogany
plywood, but it would look equally attractive in cherry
or walnut. It has drawer boxes built of solid maple with
slide-in plywood bottoms.
Building The Base And Top
Begin construction on your side table by cutting
slightly oversize blanks for the table sides, back and
bottom from mahogany plywood. Rip and crosscut mahogany
edge-banding strips. Glue and clamp the strips. After 20
minutes, scrape off excess glue, then let the glue cure.
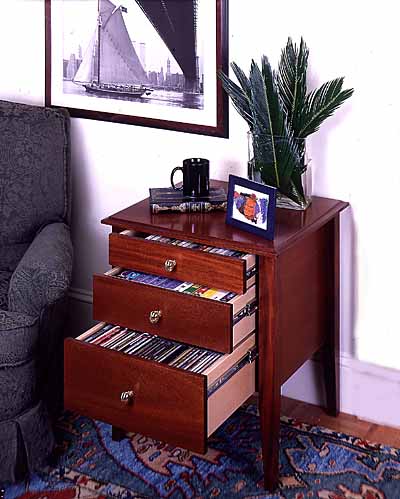
Use a plane to trim the edge banding flush to the panel
(Photo 1). Next, trim the panels to finished
dimension.
Glue and clamp
strips of mahogany to the plywood panel edges, and then
trim them flush to the panel with a block plane.
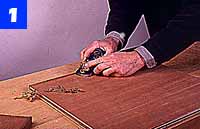
Rip and crosscut the table legs, and mark their
tapered profiles. Use a band saw to cut the legs to
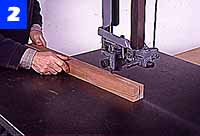
shape (Photo 2). Clamp each leg to the workbench,
then use a block plane to remove saw marks (Photo 3).
Mark the taper on
two faces of each leg, then cut the tapers on a band
saw. Stay on the waste side of the pencil line.
Clamp each leg to
the workbench top. Next, use a block plane to remove saw
marks and refine the leg taper.
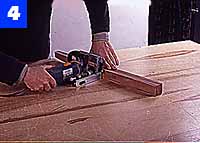
Lay out the locations of the joining-plate slots on
the sides, back, bottom and legs. Use the plate joiner
to cut all the slots except those in the rear legs that
receive the case back. These are cut later. Hold a leg
firmly to the workbench, and cut the joining-plate slot
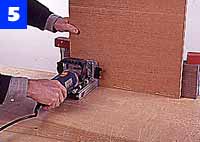
(Photo 4). Cut the joining-plate slots in the
panel edges and along the bottom edge of the back panel
(Photo 5).
Mark joining-plate
centers on each leg, then cut the plate slots. Hold the
leg firmly to the work surface while doing this.
Clamp a tall
backstop to the workbench, and hold a panel firmly
against it. Cut joining-plate slots in the panel edge.
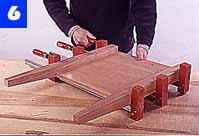
Apply glue to the joining-plate slots in the legs,
the slots in the side panels and the joining plates.
Then, clamp together the two subassemblies, each
consisting of two legs and a side panel (Photo 6).
When the glue has fully cured on the subassemblies, use
the plate joiner to cut the slots in the rear legs for
the joints with the back panel. Clamp a straightedge to
the assembly to help position the plate joiner when
cutting the slots. Note that these plate slots will
slightly intersect with the plates that form the
side-panel joints.
Assemble two legs
and one table side with glue and joining plates. Apply
pressure with a clamp at each plate location.
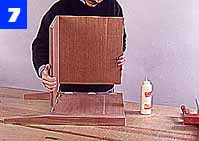
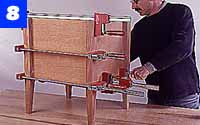
Next, join the back and bottom panels with joining
plates, glue and clamps (Photo 7). Complete the
base by joining this subassembly with the side panels
and legs (Photo 8).
Glue and clamp
together the table back and bottom. Take this
subassembly and join it to the leg-side subassemblies.
Use bar clamps at
the location of each joining plate to evenly distribute
pressure when assembling the table case.
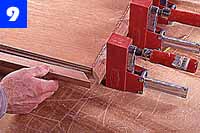
Cut the plywood panel for the table's top, and
prepare the edge banding. Cut miters on the ends of two
pieces of edge banding so they correspond to the
dimensions of the top, and then glue and clamp these to
the top. Cut mitered ends on the remaining edge banding,
then glue and clamp these to the top (Photo 9).
Glue and clamp two
mitered edge-banding strips to the top. Then, cut the
mitered banding strips that fit between them.
Gently plane the edge banding flush to the top after
the glue has cured, and cut the molding on the edge
banding with a router and cove bit. We used a
shallow-cutting cove bit (Item No. 387, MLCS, Box
4053/C-24, Rydal, PA 19046; 800-533-9298). Cut
joining-plate slots in the bottom of the tabletop, and
then glue and clamp the top to the table base using
standard plate-joining procedure.
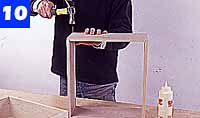
The drawer box is
built with rabbeted and grooved pieces. Assemble the box
with glue and finishing nails.
Drawer Making
Rip and crosscut the drawer box pieces and the
bottoms, then cut the rabbets and grooves in them using
a dado blade in a table saw. Drill 1/16-in.-dia. pilot
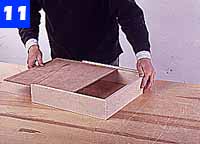
holes in the drawers (Photo 10). Slide each
bottom into its groove (Photo 11).
Cut the plywood
drawer bottom to size. Once the glue has cured, slide
the drawer bottom into its groove.
Install the drawer slides on the table's sides and on
the drawer boxes according to the manufacturer's
instructions.
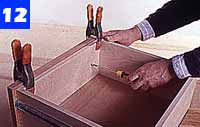
Cut drawer faces to size and install them (Photo
12). Install a knob on each drawer face. Install the
drawers, and adjust the slides so the drawers have a
uniform 1/16-in. margin on all sides. Remove the drawers
from the table and remove the knobs and slides before
finishing. Sand all surfaces with 120-, 150-, 180-
and 220-grit sandpaper. Dust off the surfaces completely
between grits.
Clamp the drawer
front to the drawer box, bore pilot holes, and attach
the front with flathead screws.
Since mahogany is an open-grained wood, the first
finishing step is to apply a grain filler. We used
Behlen Pore-O-Pac Paste Wood Filler (Item No. 843-812,
Woodworker's Supply, 1108 N. Glenn Rd., Casper, WY
82601; 800-645-9292). To apply the filler, thin it with
naphtha to a creamy consistency, then spread it over the
surface with a paintbrush. When the filler appears dull,
scrub it off with a burlap rag. Let the filler dry
overnight, then sand the surface with 320-grit
sandpaper.
We stained our table with Behlen Solar-Lux, a
non-grain-raising, dye-based stain (Item No. 847-466,
Medium Brown Mahogany, Woodworker's Supply). Although
this stain is meant to be applied with a spray gun, it
can be brushed on if you add a retarder to it (Item No.
847-585, Woodworker's Supply).
Let the stain dry overnight before applying the first
coat of Waterlox Transparent Finish (Item No. 294-001,
Woodworker's Supply). Apply this according to the
directions on the container.
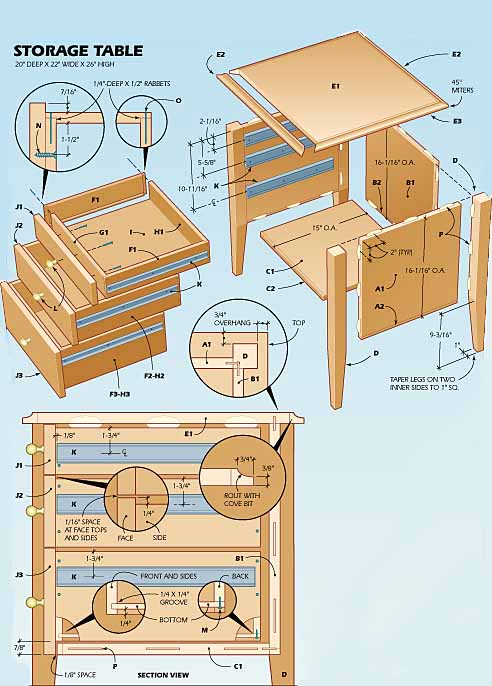
MATERIALS
LIST--STORAGE TABLE
Key
No.
Size and description (use)
A1
2
3/4 x 15 x 15 11/16" plywood (side)
A2
2
3/8 x 3/4 x 15" mahogany (edge
banding)
B1
1
3/4 x 15 11/16 x 17" plywood (back)
B2
1
3/8 x 3/4 x 17" mahogany (edge
banding)
C1
1
3/4 x 14 5/8 x 17" plywood (bottom)
C2
1
3/8 x 3/4 x 17" mahogany (edge
banding)
D
4
1 3/4 x 1 3/4 x 25 1/4" mahogany
(leg)
E1
1
3/4 x 18 x 20" plywood (top)
E2
2
3/4 x 1 x 22" mahogany (molding)
E3
2
3/4 x 1 x 20" mahogany (molding)
F1
2
1/2 x 3 1/4 x 14 1/2" maple (drawer
side)
F2
2
1/2 x 4 3/4 x 14 1/2" maple (drawer
side)
F3
2
1/2 x 6 1/4 x 14 1/2" maple (drawer
side)
G1
1
1/2 x 3 1/4 x 15 1/2" maple (drawer
front)
G2
1
1/2 x 4 3/4 x 15 1/2" maple (drawer
front)
G3
1
1/2 x 6 1/4 x 15 1/2" maple (drawer
front)
H1
1
1/2 x 2 3/4 x 15 1/2" maple (drawer
back)
H2
1
1/2 x 4 1/4 x 15 1/2" maple (drawer
back)
H3
1
1/2 x 5 3/4 x 15 1/2" maple (drawer
back)
I
3
1/4 x 14 1/4 x 15 1/2" plywood
(drawer bottom)
J1
1
3/4 x 3 1/2 x 16 7/8" mahogany
(drawer face)
J2
1
3/4 x 5 x 16 7/8" mahogany (drawer
face)
J3
1
3/4 x 7 3/8 x 16 7/8" mahogany
(drawer face)
K*
3
pair 14" drawer slides (Accuride
3832)
L*
3
knob
M
3
1/2" No. 6 rh screw
N
9
1" No. 6 fh screw
O
36
1 1/2" 4d finishing nail
P
30
No. 20 plate
*Drawer
slides (No. 32474) and knobs (No. 36608) available
from Rockler Woodworking and Hardware, 4365 Willow
Dr., Medina, MN 55348; 800-279-4441. Note: All
plywood to be veneer- or MDF-core with mahogany face
veneers.