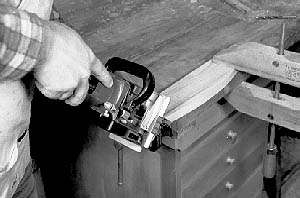
 Photo 6- Cut biscuit joints on the
mitered ends of the rails like so. Your biscuit joiner fence should
be adaptable for such a cut- most are, but if not, make a 45o
fitting to hold the biscuit joiner steady. Photo 6- Cut biscuit joints on the
mitered ends of the rails like so. Your biscuit joiner fence should
be adaptable for such a cut- most are, but if not, make a 45o
fitting to hold the biscuit joiner steady.
Use a biscuit joiner to join the legs to the rails. To cut biscuit slots on the rail ends, use your biscuit joiner to set up on a 45o surface as in photo 6. Most biscuit joiners have fences that allow this kind of cut. Carefully align the cut, and make it where the wood is thick so the slot doesn't come through the other side.
|
|
Cut slots in the legs with the biscuit joiner fence in the 90o position
as in photo 7. You can join the legs to the rails with dowels if you have
a dowel jig that will locate dowels on a mitered edge. Few dowel jigs will
do this, one that does is the Record jig. You could locate the dowels with
a drill press jig that holds the rails in the right location for accurate
boring.
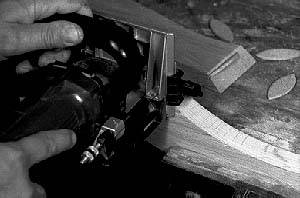 Photo 7- Use the biscuit joiner in its
normal 90o configuration to cut slots in the legs for the
rails. Photo 7- Use the biscuit joiner in its
normal 90o configuration to cut slots in the legs for the
rails. |
TOP AND SHELF
Edge glue enough pieces together for the top and shelf, to get plates
that measure 24" square and 20" square. Your biscuit joiner will really
help you out here, keeping the pieces aligned to each other during the
glue up. For the shelf, use one of the rails to flush trim the shape into
the edges. First trace the shape onto the shelf, and locate the corner
surfaces that will join the legs as shown in the drawing. Then rough cut
the curves on the band saw. Now attach one of the rails on the bottom of
the shelf on one side with small finish nails. Drill three 1/16" diameter
holes in the rail and place the nails in these holes. Flush trim this side
of the shelf, then move the rail to the next. Later, fill the holes with
putty.
Use a similar procedure to shape the top. Draw grid lines on a piece of
scrap and trace the shape from the drawing. Cut this out and sand it
smooth, then use this template to trace each side and then flush trim
it.
|
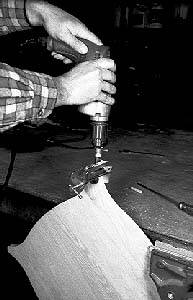 Photo 8- Use a dowel jig to bore holes
in the shelf corners and in the legs. Use 3/8" dowels. Shown is the
Stanley dowel jig. Photo 8- Use a dowel jig to bore holes
in the shelf corners and in the legs. Use 3/8" dowels. Shown is the
Stanley dowel jig.
|
|
The Dowl-It brand jig will work well for this procedure. To see it, click here.
Bore holes in the shelf ends for 3/8" dowels with a dowel jig as in photo 8. Mark locations on the legs for the corresponding dowel holes. Do so at the point of the curve on the legs which is at 90o to the floor. Because of the round over, you may need to flatten this spot on the legs to get level areas for the shelf ends to contact. Do this with a block plane or stationary sander. Use the dowel jig to bore holes in the legs.
If you choose, put a router detail on the edges of the top and shelf, but stop the detail before it gets to the corners of the shelf.
|
|
GLUE UP
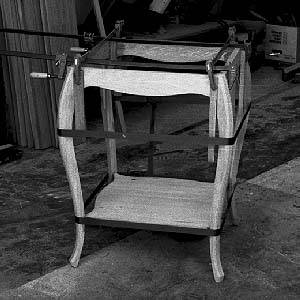 Photo 9- Band clamps and bar clamps
being used to pull the assembly together. Note the clamp blocks
between the clamps and the rails. Don't squeeze too hard with bar
clamps on a mitered biscuit joint like this or you'll tweak the
biscuits. Photo 9- Band clamps and bar clamps
being used to pull the assembly together. Note the clamp blocks
between the clamps and the rails. Don't squeeze too hard with bar
clamps on a mitered biscuit joint like this or you'll tweak the
biscuits.
Band clamps work wonders for glue ups like this (photo 9). But, they aren't always strong enough to pull the joints tight, so use bar clamps -gently- as shown to pull it tight. Another way to pull all this together is with nylon cord, which stretches a bit. If you wrap 100 feet of it tightly around the assembly, the combined squeeze of all the wrappings provides adequate pressure. Once out of clamps or cord install corner blocks with glue and screws as shown in photo 10 to strengthen the joints.
|
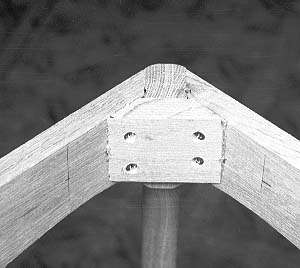 Photo 10- Biscuits are strong but
adding corner blocks like this will tremendously lengthen the life
of your table's joints. Miter them so they fit well and wet out the
end grain of the miters with glue for 5 minutes before you put them
in place to let the pores suck up as much glue as they can before it
gets squeezed out. Otherwise the pores might pull the glue out of
the joint, starving it for glue. Predrill for the
screws. Photo 10- Biscuits are strong but
adding corner blocks like this will tremendously lengthen the life
of your table's joints. Miter them so they fit well and wet out the
end grain of the miters with glue for 5 minutes before you put them
in place to let the pores suck up as much glue as they can before it
gets squeezed out. Otherwise the pores might pull the glue out of
the joint, starving it for glue. Predrill for the
screws. |
ATTACHING THE TOP
Any wide wooden plate, like this top, will have substantial movement across the grain. Therefore, don't glue the top to the rails, but screw it on with blocks at about Š x Š x 4 inches or so. Make the holes in the blocks for the screw shanks that go into the top about twice the diameter of the shanks, and use washers to hold the screw head to the wood. This way the table top can move all it wants to, dragging the screws along with it within the large holes.
FINISH
Sand to 220 grit. On a table like this that will probably get exposed to moisture from glasses or flower vases, use a water resistant finish like satin polyurethane varnish. Sand lightly with 400 grit paper between coats, and finish up with paste wax.
|
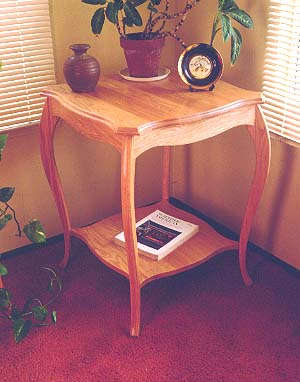
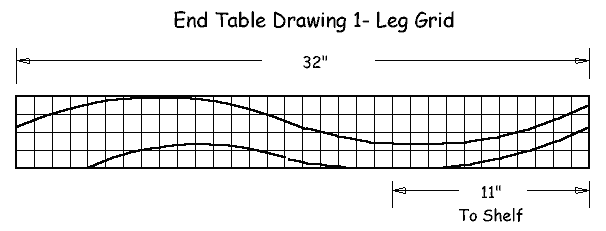
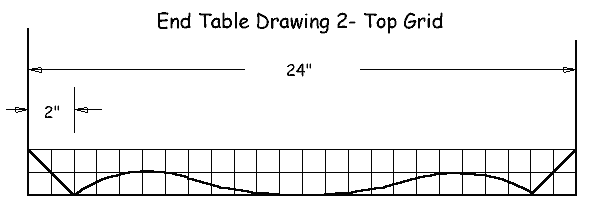
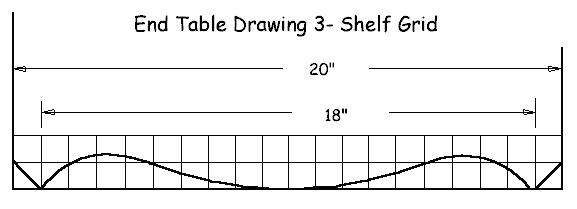

 Photo 1- Gluing up the leg blanks.
There are six pieces of wood being clamped together here, but no
glue in the middle joint, so you end up with two groups of three
each. Clean all the glue off with hot water and rags while it's
wet.
Photo 1- Gluing up the leg blanks.
There are six pieces of wood being clamped together here, but no
glue in the middle joint, so you end up with two groups of three
each. Clean all the glue off with hot water and rags while it's
wet.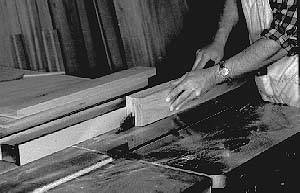 Photo 2- Take each of the glue blanks
and rip it down the middle to make each leg. Do the cut in
increments, first with the blade at 1" height and then
higher.
Photo 2- Take each of the glue blanks
and rip it down the middle to make each leg. Do the cut in
increments, first with the blade at 1" height and then
higher.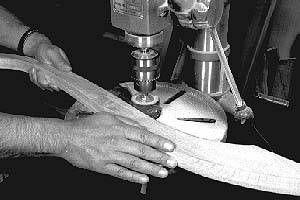 Photo 3- After you rough cut the first
leg on the band saw, sand it smooth with a drum sander in the drill
press as shown.
Photo 3- After you rough cut the first
leg on the band saw, sand it smooth with a drum sander in the drill
press as shown.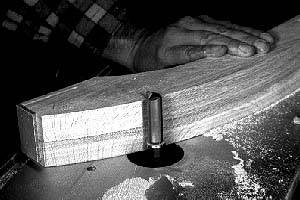 Photo 4- Now flush trim the other legs
to the shape of the first by using the first as a template at the
router table. Keep your fingers away from the bit at all
times.
Photo 4- Now flush trim the other legs
to the shape of the first by using the first as a template at the
router table. Keep your fingers away from the bit at all
times.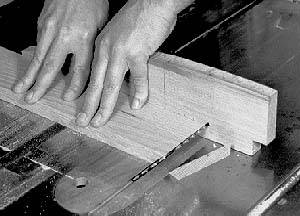 Photo 5- Cutting the miters on the
ends of the rails at the table saw. Do this before you shape the
rails because you need to flip the part to do the other end, so you
need two straight edges to get accurate
miters.
Photo 5- Cutting the miters on the
ends of the rails at the table saw. Do this before you shape the
rails because you need to flip the part to do the other end, so you
need two straight edges to get accurate
miters.