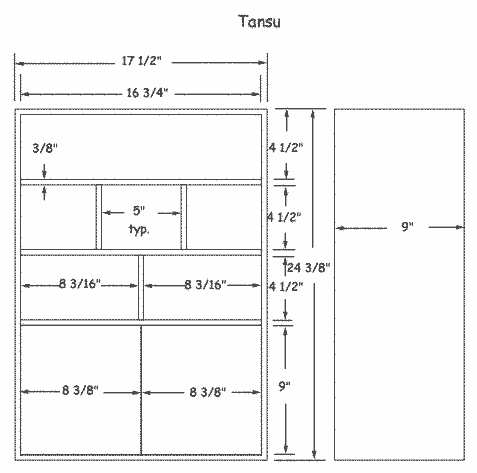
Tansu


A tansu is a Japanese chest of drawers. They are traditionally constructed with hand tool techniques, but I have adapted my design to use router methods to speed up the process. You'll need to get a dovetail jig for this project- more on that later. Or, if you choose, you can cut the dovetails by hand. This will take some time, since there are 28 joints to cut, but if you accept this challenge you will become very proficient at fitting these joints by hand. With a router jig, however, you can cut all the joints in an afternoon.


Cut List Tansu

If you use parts of different thickness for the spacers or carcass sides, you will need to alter dimensions accordingly.
2- 3/8 x 9 x 24-3/8 sides
2- 3/8 x 9 x 17-1/2 top and bottom
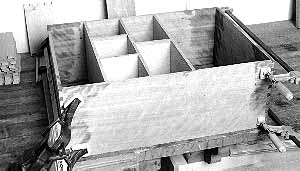
3- 3/8 x 8-3/4 x 17-1/8 spacers
3- 3/8 x 8-3/4 x 4-7/8 spacers
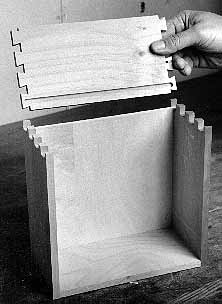
2- 3/8 x 4-7/16 x 16-11/16 drawer front and back
6- 3/8 x 4-7/16 x 5-9/32 drawer fronts and backs
2- 3/8 x 4-7/16 x 8-1/8 drawer fronts and backs
12- 3/8 x 4-7/16 x 8-3/4 drawer sides
2- 3/4 x 9 x 8-3/8 doors
1/4" plywood to fit for the box back and drawer bottoms.

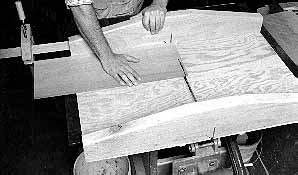
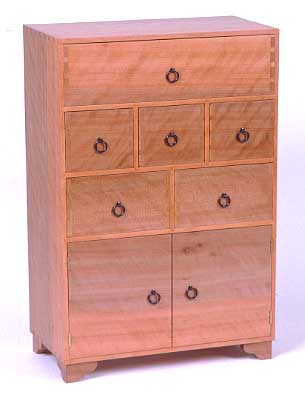
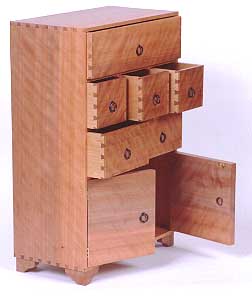
You'll need a lot of lumber for this project, because of all the drawer parts. There is no sense in using expensive wood for the sides and rears of the drawers, so get a secondary wood for this like alder or poplar. For the carcass and drawer fronts choose something pretty, like the curly madrone I chanced upon and used here (which, unfortunately, is probably difficult to find).

You can reduce the amount of lumber you have to buy for this project by resawing 1x lumber down the middle and using both pieces- you'll get two for the price of one. I started with pieces that were fully 1" thick and, after planing the resawn pieces, ended up with 3/8" thick pieces. If all you can find is 3/4" thick stock, resaw this for the drawer parts and use it at whatever thickness it comes out at (probably 5/16" or so). But for the carcass this is a bit too thin. If you start with 3/4" stock for these pieces, plane them to 1/2", or leave them at 3/4". The dovetail jigs will take any thickness below 1". Note that if you use different thicknesses you will have to jockey around with some of the dimensions I've given.

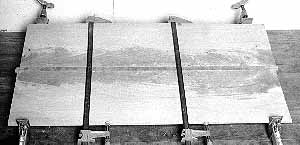
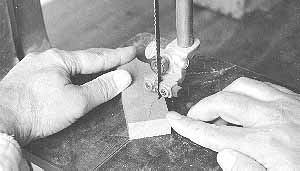
Use your secondary wood for the spacers between the drawers. Your first step, after resawing and planing, is to glue thin pieces of your primary wood onto the leading edges of the spacers where they are visible. Clamp up such an edge gluing as in photo 1. When this is out of clamps rip all your stock to width.

Photo 1- Here two alder boards get madrone strips glued to them. On such a glue up it is wise to place the thin strips against each other in the middle as shown, because if the clamps contact them they can distort.

Your pieces need to be cut to length carefully both in terms of length and squareness. Similar parts, like drawer sides or opposing carcass sides, must be exactly the same length or the drawers and box will be out of square. Use a radial arm saw with a stop block to ensure that same length pieces are indeed the same, or use a cutoff box on the table saw as in photo 2.

Photo 2- A table saw cutoff box will give you very accurate results. Use a fixed end stop, in this case a clamp, to make repeatable cuts of the same length.

DOVETAIL JIGS

There are three general types of dovetail jigs; those that cut half blind dovetails only, those that cut through dovetails only, and those that are capable of both. In terms of expense, the first type are generally inexpensive, the second are moderately expensive, and those that do both are expensive. Here let's look at jigs that do through dovetails only. You can, however, use any dovetail jig for this project, though you will need to shorten dimensions of some pieces if you use half blind dovetails. Remember that if you use half-blind dovetails the joints will be hidden on the drawers.

Jigs that cut through dovetails only are very simple to use. They consist of two flat templates that mount on simple fences. You clamp the template and fence to your work, place your router on top of the template, and the bit makes the cut guided either by bearings or a template guide.

I used a Dovemaster through jig to build this project, but it seems that that jig is no longer available. Two currently available alternatives are the Keller and Katie jigs. Keller has several models, some made from machined aluminum and some from phenolic (a fancy name for plastic?). Their least expensive model is around $150. Katie Jig has a model for around $230, which has the advantage over Keller of allowing variable spacing between dovetails. Both these manufacturers make high quality jigs, better than the old Dovemaster which was inexpensive, but you get what you pay for and you pay for what you get.

Photo 3- Here the Dovemaster jig is set up to cut the dovetails, using a dovetail bit and template guide. Keller and Katie jigs use bearing guided bits, which are superior in the long run.
 

The basic principle for using the Keller or Katie is the same as with the Dovemaster pictured here. Before you cut your parts, make test cuts with your jig on scrap until you have the fences adjusted for tight joints. Then cut out the project pieces. First cut the dovetails as in photo 3, then cut the pins as in photo 4. The reason for this order is that on the pin cut you can adjust the fit of the joint, and if after cutting a few joints you notice that the fit is getting looser or tighter, you can adjust for the remainder.

Photo 4- To cut the pins, a straight flute bit is used. By moving the template forward or backward on the fence, you alter the thickness of the pins. Note the taper of the template tangs.

A problem with the Keller jigs is that the spacing of the dovetails is set by the templates. This means that, depending on the width of your parts, the joint might have a half pin on one end and a half dovetail on the other. Or, it might end with two half dovetails which is structurally fine but a faux pas to traditionalists. You can settle for this, or design the widths of your parts around the spacing of the jig. A third alternative is to center a given number of dovetails along your part width, and then cut off the half dovetails that remain on the ends with a hand saw. If you do this, be cautious not to make the pin cuts that correspond to the half dovetails which will be cut off. The Katie jig allows you to adjust the spacing of your dovetails to accommodate the width of your stock.

Note that how deep you make your pin cuts affects the final width of your drawers. Your drawers need some clearance in width, but no more than 1/16". Be sure not to give yourself more clearance than you intended with deep pin cuts.

Once the dovetails are cut, dry assemble the four carcass sides. Use a bearing guided rabbeting cutter to cut a 1/4 x 1/4" rabbet around the inside of the back of the box as in photo 5. By doing so with the parts assembled you avoid going through at the ends where it would be visible. Square up the resulting rounded corners with a sharp chisel.

Photo 5- Dry clamp the carcass and cut the rabbet for the plywood back with a bearing guided rabbeting cutter.

Join the drawer spacers to each other and the carcass sides with sliding dovetails that are 3/16" deep. To cut the slots, clamp a fence to the carcass sides as in photo 6 and push the router by hand along the fence. This requires careful measurement to accurately locate the fence. Cut the dovetails on the ends of the spacer parts at the router table, holding the parts vertically against a tall, long fence. Make one pass on each side with your dovetail bit to complete the dovetail. Do lots of test cuts on scrap before you commit your parts.

Photo 6- Cut dovetail slots on the inside of the carcass sides with your router riding against a fence as shown.

If you like you can cut the dovetail slots through the front edge of the carcass sides, or stop the cuts. In the latter case, you must notch the spacers to fit over the stopped area of the slot. This done, glue up the carcass with the spacers as in photo 7. You really don't need to glue in the spacers so long as the fit is snug, if it's loose use glue to keep them from rattling.
Photo 7- When gluing up the carcass, don't apply any more pressure than is required to bring the joints together, or you may bend the parts. Check the box for square.

Cut a 1/8" deep by 1/4" wide groove on the inside face of the drawer parts for the drawer bottoms, with a straight flute bit on the router table (photo 8). Stop the grooves on the drawer sides with a setup similar to that shown in the Finger Joint Jewelry Box article on this site. If you don’t stop them, the grooves will be visible from the front of the drawers.
Photo 8- Cut a groove for the drawer bottoms on the inside of the drawer parts with a straight flute bit at the router table.

Make drawer bottoms out of 1/4" plywood to fit within the grooves you've cut. Dry assemble the drawers to be sure the bottoms aren't too big, then glue them up. When the glue is dry, flush all the joints by sanding or planing.

Since the box is rather Spartan in design, I decided to keep the feet simple. You may decide to make them more fancy. I simply cut out a curved design as in photo 9, then mitered them on a disc sander and glued them in place.

Photo 9- Cut the curves on the box feet with a band or scroll saw.

Use 3/4" thick pieces of wood for the two doors on the box bottom. At this thickness (or perhaps slightly less) they will be strong and stable. Hang them with butt hinges, and install catches to hold them in place.

A supplier for obtaining Japanese hardware is Hida Tool. I used Japanese pulls on this box, which are very easy to install. They are like cotter pins, you simply insert one end through a hole and bend the fingers outward inside the drawer.

Hosted by uCoz