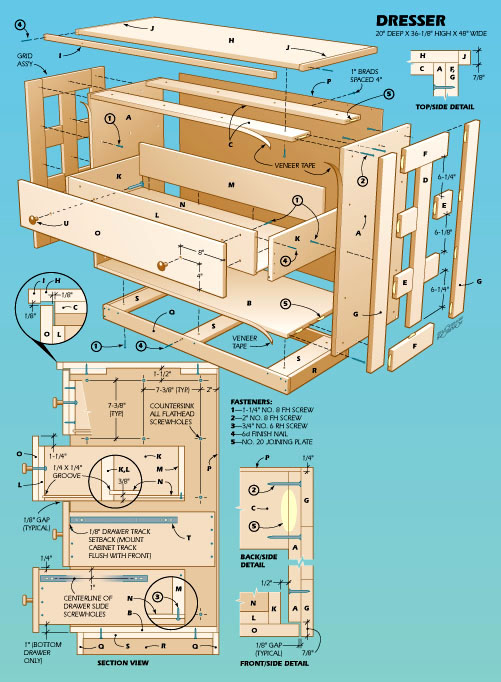
DRESSER
Keep the clothes off the floor with our easy-to-build dresser.
TEXT AND PHOTOS BY NEAL BARRETT

While it may seem that some kids can go indefinitely wearing the same T-shirt and pair of jeans, most have an appetite for clothes that can strain the most ample budgets. And where do you put it all?

Well, before you decide to build an addition on the house, take a close look at our solution. Designed to 
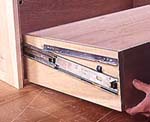
match the rest of our bedroom suite, this dresser features four generous drawers that slide effortlessly on ball-bearing-equipped tracks, and sturdy plywood construction with solid poplar detailing.

Best of all, the dresser is easy to build. The case joinery utilizes a combination of joining plates and screws–the plates ensure perfect joint alignment while the screws provide holding power and eliminate the need for glue and a lot of long clamps. We've also streamlined drawer construction by employing simple and fast glue-and-nail joints.

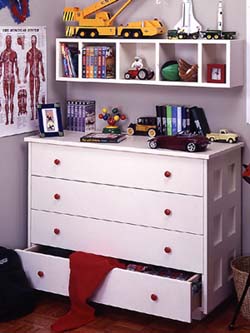
As shown in the photo (right), we've accessorized our dresser with a wall-mounted storage unit. This piece is based on the shelf assembly featured with our desk (see "Stay Tuned"). To build the wall-mounted unit, follow the instructions given for the desk unit, but eliminate the leg sections and cut the end panels to 10 1/2 in. long.


Нажмите для увеличения
 

Case Construction

Equip your circular saw with a fine-tooth blade to cut the plywood case parts to size. For accuracy, use a straightedge guide positioned at the appropriate distance from your cutline. With the guide square to the edge of the panel, hold the saw base against the guide while moving the saw slowly forward.

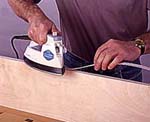
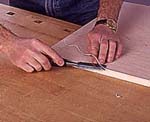
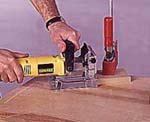
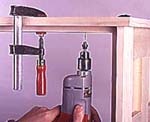
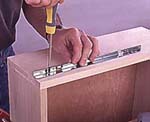
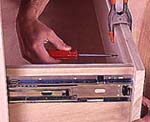
Use a household iron to apply veneer tape to the front edges of the plywood case sides, bottom and front cleat (Photo 1). Set the iron to its highest setting, and advance it slowly while you press down firmly. Position the 1 3/16-in.-wide tape so there's a slight overhang on each side of the panel.

1--Heat the hot-melt adhesive on the back of the veneer tape with an iron. Slowly advance the iron with firm pressure.

Trim the excess tape flush to the panel faces with a razor-sharp chisel. If the tape tends to tear, reverse the direction of the chisel (Photo 2).

2--Use a sharp chisel to trim the overhanging edges of the veneer tape. If the tape begins to tear, reverse the cutting direction.

Mark the locations of joining plate slots on the plywood case parts. First cut the slots in the ends of the cleats and bottom. For good joint registration, hold both the piece and plate joiner tight to your worktable. To cut the slots in the case sides, first clamp a tall fence to the worktable. Use this fence as a support to hold the sides in a vertical position while cutting the slots (Photo 3).

3--Use a plate joiner to make the slots for the case. Clamp case sides vertically and register the slots against your work surface.

Bore screw clearance holes through the case sides and countersink the holes so that the screwheads will be slightly recessed.

4--Assemble the case by screwing the sides to the cleats and bottom. Use clamps to hold the pieces while you drive the screws.

Install joining plates in the case joints. Since these joints depend on screws for their strength, don't apply glue to the plates. Then, assemble the case parts. Use clamps to hold the parts together while you bore pilot holes into the panel edges and drive the screws (Photo 4). Set this assembly aside while you construct the poplar grids. Using a square to guide your circular saw, cut the poplar grid pieces to length. Then, lay out the joining plate slot locations and cut the slots. When cutting into endgrain, especially on short pieces, clamp the part to the worktable (Photo 5).

5--Cut plate slots in the grid assembly components. Clamp pieces to your work surface for safe and accurate cuts.

Apply glue to the slots and plates for the joints between the mullion and the short, center rails. Join the rails to the mullion (Photo 6), and then use clamps to pull the joints tight until the glue sets. Next, join the top and bottom rails to the mullion ends. Again, clamp the joints (Photo 7). Finally, join the two stiles to the rail ends.

6--Spread glue in the slots and on the plates and assemble short rails to the mullion. Clamp the subassembly until the glue sets.

Making The Grids

Use a clamp at each rail to ensure that the joints are tight. Compare opposite diagonal measurements of the grid assembly to be sure that it is square. If the measurements differ, adjust the clamps until they are the same.

7--Apply glue to the end rail joints and clamp to the mullion. After the glue has set, attach the grid stiles with glue and plates.

Assembly And Top

Position a grid assembly against each plywood case side, adjusting for the proper overhang at the front and back edges. Use clamps to temporarily hold the parts together, and bore and countersink pilot holes through the case sides. Pay attention to the hole locations as shown in the plans so you do not place screws where they might interfere with the drawer track installation. Fasten the grids with 1 1/4-in. No. 8 fh screws (Photo 8).

8--Clamp the grid assemblies to the case sides. Bore and countersink screw pilot holes and drive screws to fasten the grids.

Use your circular saw and rip guide to cut edge strips for the dresser top, and then crosscut the strips to length. Apply glue to one end of the top panel and position a strip so it's flush with the top surface and overhanging 1/8 in. on the bottom. Clamp the strip while you drive 6d finish nails. The clamp will keep the strip from moving, ensuring that it stays flush with the top of the panel. Apply the strip at the opposite end of the panel, and add the front edge. Set the nailheads.

Clamp the top in place while you bore and countersink pilot holes through the cleats (Photo 9). Fasten the top to the case with 1 1/4-in. No. 8 fh screws.

9--After gluing the edges to the plywood top, clamp the top in place and bore screwholes. Then, screw the case to the top.

The Drawers

Rip and crosscut the drawer parts to finished dimension. Rout the grooves in the drawer sides and fronts for the bottom panels. Use a 1/4-in. straight bit and an edge-guide accessory (Photo 10).

10--Rout grooves for the drawer bottoms in the drawer front and side panels. Use a 1/4-in. straight bit and router edge guide.

Sand the interior drawer surfaces with 120-, 150- and 180-grit sandpaper before assembly. Then, dust off the pieces and assemble the drawers. Apply glue to the mating surfaces, and use clamps to hold the parts together while you drive 6d finish nails (Photo 11).

Cut the 1/4-in. plywood drawer bottom panels to size and sand them, finishing with 180-grit sandpaper. After dusting off the bottom panels, slide each one into the grooves of an assembled drawer.

11--Apply glue to the drawer box joints. Then clamp the boxes together and drive nails at the corners. Set the nailheads.

Then, drill pilot holes and drive screws through the panels into the drawer backs to secure the panels (Photo 12). Glue or screws are not used in the panel grooves.

12--After sliding the 1/4-in. bottom panels in place, secure them to the drawer backs with 3/4-in. No. 6 rh screws.

Mount the drawer rails to the drawer sides (Photo 13). Drive screws through the vertical slots at the ends of each rail to allow for adjustment after installation. The rails must be mounted 1/8 in. back from the front edge of the box.

13--Fasten the drawer halves of each track to the drawer sides with screws driven through the vertical slotted holes.

Lay the case on its side on your worktable to mount the remaining track halves (Photo 14). Drive screws through the horizontal slots at each end of the slides to allow for track adjustment. This time, position the track halves so that the front ends are flush with the front edge of the dresser case.

14--Install the case tracks by screwing through the horizontal slotted holes. Place tracks flush with the front edges of case.

Final Steps

Cut the back panel to size. Compare opposite diagonal measurements of the case to be sure that it is square. Then nail the back in place with 1-in. brads (Photo 15).

15--After checking that the case is square, install the 1/4-in. back panel with 1-in. brads driven about 4 in. apart.

To install the drawers, engage the drawer rail under the small hooks at the back edge of the tracks, then lower the drawer over the plastic clips until you hear them click into place (Photo 16).

16--Install each drawer by engaging the drawer member with the hook at the back of the track. Then, lower front of drawer.

Cut poplar stock to size for the drawer faces. Starting with the bottom drawer, clamp the face to the box, bore screwholes from inside and drive screws to fasten the face (Photo 17). After all faces are installed, check their alignment and adjust the slides to achieve a uniform 1/8-in. space around each. Drive screws into all the remaining track-mounting holes.

Bore holes for the drawer knobs and mount the knobs with 1 3/4-in.-long mounting screws. Remove the drawers for painting.

17--Clamp drawer face to drawer box. Then bore and countersink screw pilot holes. Attach each face and check alignment.

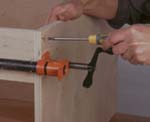
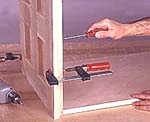
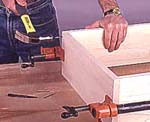
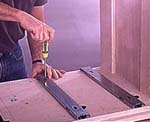
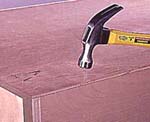
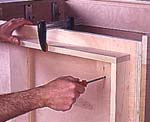
Use glue and 6d finish nails to assemble the toe kick base. Lay the cabinet on its back, and clamp the base to the case bottom while you bore pilot holes and screw the toe kick in place (Photo 18).

Set all nailheads and fill the holes with wood filler. Sand the case and drawer parts, finishing with 180-grit paper, and clean away the dust. Apply a good latex primer to all cabinet surfaces and drawer faces. If you wish to finish the drawer boxes, use two coats of shellac.

When the primer is dry, lightly sand all surfaces with 180-grit paper. Then dust it off before painting. Apply two coats of a quality latex semigloss enamel, following the directions supplied by the manufacturer. When the paint is dry, reinstall the drawers.


MATERIALS LIST–Dresser

Key No. Size and description (use)
A 2 3/4 x 18 1/8 x 32 5/8" plywood (side)
B 1 3/4 x 18 1/8 x 43 1/2" plywood (bottom)
C 2 3/4 x 4 1/2 x 43 1/2" plywood (cleat)
D 2 3/4 x 3 1/2 x 25 5/8" poplar (mullion)
E 8 3/4 x 3 1/2 x 4 3/8" poplar (short rail)
F 4 3/4 x 3 1/2 x 12 1/4" poplar (rail)
G 4 3/4 x 3 1/2 x 32 5/8" poplar (stile)
H 1 3/4 x 19 1/4 x 46 1/2" plywood (top)
I 1 3/4 x 7/8 x 48" poplar (edge)
J 2 3/4 x 7/8 x 19 1/4" poplar (edge)
K 8 3/4 x 6 3/4 x 18" poplar (drawer side)
L 4 3/4 x 6 3/4 x 41" poplar (drawer front)
M 4 3/4 x 6 1/8 x 41" poplar (drawer back)
N 4 1/4 x 17 1/2 x 41 1/2" plywood (drawer bottom)
O 4 3/4 x 8 x 44 3/4" poplar (drawer face)
P 1 1/4 x 32 5/8 x 45" plywood (back)
Q 2 3/4 x 2 3/4 x 43" poplar (toe kick face)
R 2 3/4 x 2 3/4 x 16" poplar (toe kick side)
S 3 3/4 x 4 x 16" plywood (cleat)
T* 4 18" drawer tracks (Accuride No. 3037-18")
U** 8 1 1/4"-dia. knob (Hafele No. 13893100)
Misc: No. 20 joining plates; 2" No. 8 fh woodscrews; 1 1/4" No. 8 fh woodscrews; 3/4" No. 6 rh woodscrews; 6d finish nails; 1" brads; birch veneer tape; glue; sandpaper; latex primer and enamel.
Notes: All plywood birch veneer; dimensions include veneer tape where applicable. *Available from Rockler Woodworking and Hardware, 4365 Willow Dr., Medina, MN 55340 (stock No. 32821) ** Hafele America Co., 3901 Cheyenne Dr., P.O. Box 4000, Archdale, NC 27263
 
18--After assembling the toe kick pieces with glue and nails, clamp the base to the dresser, bore screwholes and drive screws.
Hosted by uCoz