![]()
By Tim
Johnson
Thrill the garden lover in your family with one (or
more!) of these easy-to-make projects.
 Before you set aside your push
sticks and dust mask for the season, make something to enjoy all summer. Each
one of these projects takes only about a day to build, once youÆve got all the
materials. TheyÆre designed for outdoor useŚmade from rot-resistant woods and
assembled with weatherproof glue and rust-resistant fasteners. Protected with a
finish or not, theyÆll enhance your garden or deck for years to come.
Before you set aside your push
sticks and dust mask for the season, make something to enjoy all summer. Each
one of these projects takes only about a day to build, once youÆve got all the
materials. TheyÆre designed for outdoor useŚmade from rot-resistant woods and
assembled with weatherproof glue and rust-resistant fasteners. Protected with a
finish or not, theyÆll enhance your garden or deck for years to come.
![]()
![]()
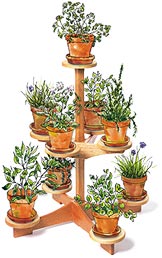
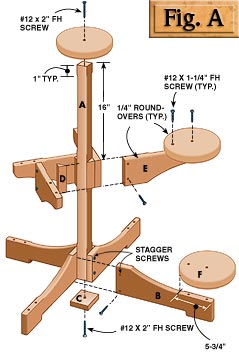
This sturdy little stand is perfect for your deck or patio. ItÆs got room for
your favorite plants and it doesnÆt take up a lot of space. When the weather
gets cold, you can easily bring it, and a bit of summertime, indoors.
ThereÆs no complicated
joinery, just glue and screws. The legs simply chase each other around the
base, like a pinwheel. The arms follow suit, but theyÆre offset, so your plants
have plenty of room to grow.
Once you make templates for
the legs and arms and the jig for routing the discs, youÆll have the stand
together in no time. For tools, youÆll need a tablesaw, jigsaw, router and a
drill, plus clamps and a file or rasp. If you use construction-grade lumber,
you wonÆt need a planer or jointer. Rip the 1-1/2-in.-square column from a
straight, clear 2x4 and use 1x stock for everything else. We went whole-hog,
making ours out of mahogany. We spent about $100 for rough stock and milled it
ourselves.
![]()
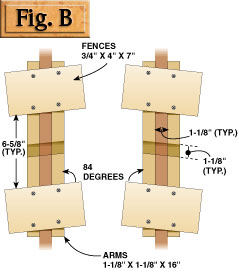
- Mill all the parts to thickness. Cut the
column (A), legs (B) and arms (E) to their finished dimensions.
- Make templates for the leg and arm profiles (Fig. C).
- Rough out the legs and arms with a jigsaw
or bandsaw, about 1/8-in. oversize. Smooth the profiles with a rasp and
sandpaper, a sanding drum mounted in your drill press, or an oscillating
spindle sander.
 Position each leg on the column
and drill pilot holes for the screws (Photo 1). Be sure to mark the legs so
theyÆll go back on the same column face during final assembly.
Position each leg on the column
and drill pilot holes for the screws (Photo 1). Be sure to mark the legs so
theyÆll go back on the same column face during final assembly. - Round over the edges of the legs, except
for portions that support the discs or go against the column (Fig. A).
On the column, stop the round-overs 1-in. away from the joints.
- Fasten the legs to the column with
weatherproof glue and stainless steel screws.
- Attach the column support block (C).
- Glue the triangular-shaped arm blocks (D),
cut from your leftover column stock, to the column (Photo 2). If a stuck-on block keeps
sliding down the column, pull it off, remove the excess glue and stick it
back on. Before gluing on the second pair, plane the first pair flush.
- Attach the arms, following the same
procedure you used for fastening the legs (Steps 4 through 6). Make sure
the arms wrap around the column in the same direction as the legs,
otherwise the discs wonÆt be properly staggered.
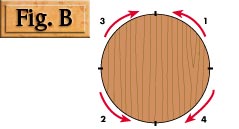
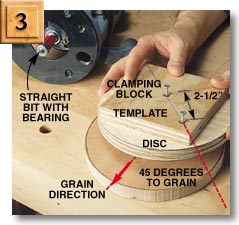
 Make a jig to rout the discs (Part
F, Fig. A and Photo 3), cut them to rough size and
rout them (Fig. B). Then
round over the edges.
Make a jig to rout the discs (Part
F, Fig. A and Photo 3), cut them to rough size and
rout them (Fig. B). Then
round over the edges. - On all discs but one, drill out both holes
left by the jig for the mounting screws. Countersink the holes on one
side. Drill out only the center hole on the disc thatÆll go on top of the
column. Position the discs on the legs and arms, drill pilot holes, and
fasten them.

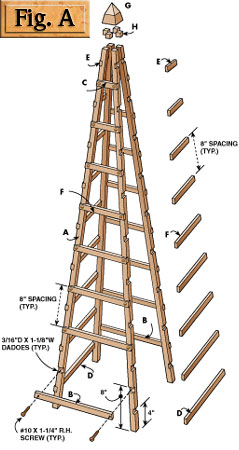
- Exploded
View
The legs and arms are offset to stagger the pots and maximize growing room for your plants.

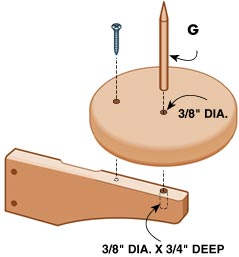
ĀDetail 1: Optional Pot
Spike
12.Ā To keep your plants from getting blown off
their discs by the wind, you may want to install pot spikes (G) in the arms and
legs (Fig. A, Detail 1). Drill out the discsÆ center holes, as well as
the corresponding screw holes in the legs and arms, with a 3/8-in. bit. Then
glue sharpened mahogany or white oak dowels into the arms and legs. Slip the
discs over the dowels and fasten them with the remaining screws. Stake your
plants on the dowels, using the drainage hole in the bottom of the pot. Provide
air space between the pot and the disc by using a plastic "deck
protector" (available at garden stores).
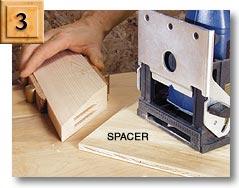
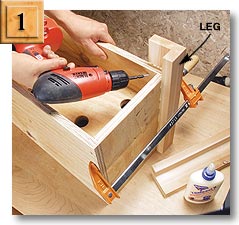
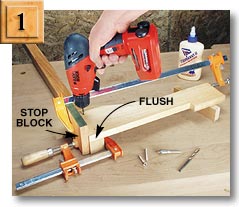 A
stop block ensures perfect alignment when you
mount the legs. First, clamp the stop block to the column. Then, clamp the leg
to the stop block, making sure the bottoms of the leg and column are flush.
After drilling pilot holes, countersink and drill out the leg holes so the
screws will slip through and fit flush.
A
stop block ensures perfect alignment when you
mount the legs. First, clamp the stop block to the column. Then, clamp the leg
to the stop block, making sure the bottoms of the leg and column are flush.
After drilling pilot holes, countersink and drill out the leg holes so the
screws will slip through and fit flush.
 Routing
the Wooden Discs
Routing
the Wooden Discs
To avoid tearing out the discs, youÆve got to make four passes, so you can
always rout "downhill," following the grain. Make the
counterclockwise passes (Steps 1 and 2) first. The two clockwise passes (Steps
3 and 4) require extra care, because youÆre advancing the router in the same
direction as the spinning bit. K eep a firm grip, as the router has a tendency to jump
or skip ahead when the bit contacts the wood
Leg and Arm Profiles
The legs and arms share the same curve, so you really only have to make one
template. Enlarge this pattern at a copy center by 250 percent and then again
by 202 percent, until th
e dimensions are correct.
|
|
|
||||||||||||||||||||||||||||||||||||
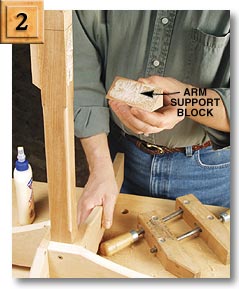
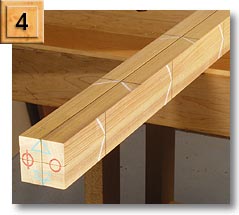
 Glue
the arm support blocks to the column, two at a time. Keep
them properly aligned by going easy on the glue and using finger pressure to
initially set the joint. Wait until the blocks are firmly attached before
clamping. Once installed, these four triangular blocks create a mount for the
arms thatÆs offset from the legs.
Glue
the arm support blocks to the column, two at a time. Keep
them properly aligned by going easy on the glue and using finger pressure to
initially set the joint. Wait until the blocks are firmly attached before
clamping. Once installed, these four triangular blocks create a mount for the
arms thatÆs offset from the legs.
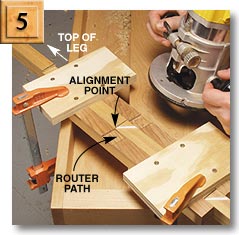
Rout perfect discs easily with a simply made two-piece jig. The block allows you to clamp the assembly to your workbench. The template lets you rout the round shape. Orient the screws at a 45-degree angle to the discÆs grain. Then the disc will be fully supported across the grain when itÆs mounted.
![]()
![]()
Make any climbing plant happy with
this 6-ft. tall, free-standing trellis. We used dadoes, glue and screws to
fasten the slats because trellises take a beating each year when you tear off
the old vines. We built our trellis from cypress, one of the longest-lasting
outdoor woods. Ours was recycled from old water tanks and cost about $175 (see Sources, page 98). White oak, at $60, would
also be a good choice.
![]()
Marking the legs for the dadoes can be confusing, but if you follow our marking
procedures (Photos 1 through 4, page 75), you canÆt mess up. Even with our
easy-to-make jigs, routing 68 dadoes is noisy, dusty and tedious (Fig. B and Photo 5). But once theyÆre done, the dadoes
make assembly foolproof. ThereÆs only one angle to remember: Everything slopes
6 degrees.
![]()
YouÆll need an angled template, made with the miter gauge on your tablesaw, to
make the dadoing jigs. YouÆll also need a router with a straight bit to cut the
dadoes, and a drill with a slotted tip for all the screws. We used a jointer
and planer to mill our parts to thickness, but they could also be ripped to
size on a tablesaw. The slats are thin, so be sure to use a push stick.
![]()
![]()
 Mill the legs (A) to thickness
and cut them to length.
Mill the legs (A) to thickness
and cut them to length. - Mark the leg dadoes (Photos 1
through 4). The sides of the trellis are
tapered, so the dadoes are angled.
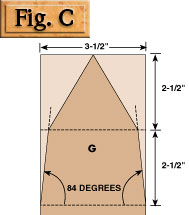
- Cut an 84-degree angled template, about 10-in. long and at least 4-in. wide. Use it to set the fence angle on the dadoing jigs (Fig. B).
- Dado the legs (Photo 5). One jig will slope the right
direction for the 3/16-in. deep dadoes on one side of each leg. The
mirror-image jig will be correct for the other side.
- Mill slat material to thickness and rip it
into lengths, slightly oversize in width. Then plane (or rip) the slats to
fit the leg dadoes.
- Cut the bottom and top slats (B through E)
for all four sides to length, with a 6-degree bevel on both ends. You can
cut the slats to length in pairs because opposite sides of the trellis are
the same.
- Frame the front and back faces of the trellis (Photo 6). Align the beveled ends of the slats with the edges of the legs and drill pilot holes. Then drill out the holes in the slats so the screws slip through. Apply glue and assemble.
- Cut the internal slats (F) to fit, and
fasten them, following the procedures in Steps 6 and 7.
- Stand the assembled front and back faces
back-to-back in an "A," and assemble the sides, following Steps
7 and 8.
 With a handsaw, square off the
legs at the top of the trellis.
With a handsaw, square off the
legs at the top of the trellis. - Bandsaw the spire (Part G, Fig. C). Lay out the pattern on two
adjacent faces of a glued-up blank. Make the blank a foot long to keep
your fingers a safeĀ distance from
the blade. After cutting the first two sides of the pyramid, tape the
offcuts back onto the blank. Rotate the blank 90 degrees and cut the other
two sides of the pyramid. Cut the second set of taper s the same way.
After sanding, cut the spire from the blank.
- Glue and screw retaining blocks (H) to the
bottom of the spire, then soak it in preservative.
- Screw the optional anchor spikes (Fig.
A, Detail 1) onto the legs.
Following this sequence guarantees a successful layout
 Detail
1: Optional Anchor Spikes
Detail
1: Optional Anchor Spikes
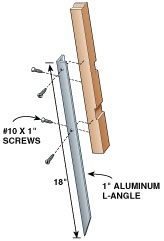
For windy conditions, you may want to anchor your trellis with aluminum spikes
on each leg. For longer life, soak the ends of the legs in wood preservative or
coat them with epoxy
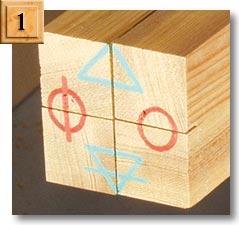
Mark the bottoms of the legs.
Bundle the legs together and mark the front and back faces as one pair and the
two side faces as the other.

 Mark
the first pair of faces.
Mark
the first pair of faces.
The dadoes on the front and back faces match, so they can be marked at the same
time. Arrange the legs with the triangles at the top. After aligning the ends,
draw reference lines every 8 in. to mark the dadoes. Then go back and mark the
slope, which runs outward from the center of each pair.
Mark the second pair of faces.
Rearrange the legs with the circles at the top, and align the ends. Then mark
the dadoes, using the same 8-in. spacing. This time, however, start 4 in. from
the bottom. As you can see from the mark on the right, these dadoes are offset
from the other pair of faces.
 Your
bundle should look like this.
Your
bundle should look like this.
Check to see that each leg has its two outside faces marked, that the marks are
staggered, and that the slope of the dadoes is clearly indicated.
 Cut
angled dadoes in the legs.
Cut
angled dadoes in the legs.
Slide the leg in, top end first, making sure that its slope indicators run the
same direction as the jig. Align the dado reference line on the leg with the
top inside shoulder of the jigÆs dado, clamp and rout. Remember: The reference
line always marks the top of the dado and the slope indicator should always be
in the routerÆs path.
Assemble one face at a time.
Frame each face by fastening the top and bottom slats to a pair of legs. Then mark, cut and install the
middle slats.
 Jigs
for Routing Angled Dadoes
Jigs
for Routing Angled Dadoes
Because the sides taper, you need two mirror-image jigs, both angled 6 degrees
from perpendicular. Use a template cut at 84 degrees to set the angle. Make the
arms from extra leg stock. To get the proper spacing, slide another piece of
extra leg stock between the arms when you mark the angles, fasten the fences
and rout the dadoes. Use a spacer to keep the fences parallel so the dadoes are
the same width on both jigs. The spacerÆs width depends on the diameter of the
bit you use and the size of your routerÆs baseplate. For example, to make the
1-1/8-in.-wide dadoes, using a 1/2-in. straight bit in a router with a 6-in.
diameter base, the spacer is 6-5/8-in. wide.
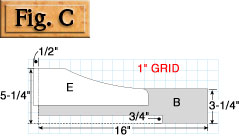
Tapered Pyramidal Spire
The lower half of the spire continues the 6-degree taper of the sides. The top
half accentuates the pyramidal shape. Ready-made spires, some with copper
details, are also available at home centers and garden stores.
![]()
![]()
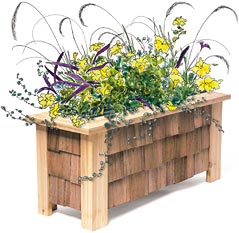
If you can build a box, you can build this planter. ItÆs much sturdier than
most commercial versions, so it should last for many years. ItÆs also the
perfect opportunity for you to try your hand at shingling!
The opening accommodates a
30-in. drop-in plastic window-box planter. TheyÆre available at any garden
store in several lengths. You could easily alter the design to fit a
different-size box, or to accommodate individual pots. A square version of this
planter would also look great.
All the materials you need
lie waiting at a full-service lumberyard. You donÆt have to be choosy about the
CDX exterior-grade plywood, but it pays to look through the cedar stock for
straight, knot-free boards. If you invest in a bundle of top-grade red cedar
shingles (about $45), youÆll easily have enough to cover two planters. Lower
grade bundles cost half as much, but have lots of knotty pieces that you wonÆt
use. Our total cost, including the plastic planter and top-grade shingles, was
about $95.
We cleaned up the 2x6 stock
and 5/4 decking with a jointer and planer and cut all the pieces to size on a
tablesaw. We used a bandsaw to cut the wide bevels on the top pieces, and a
biscuit cutter and biscuits to reinforce the topÆs miter joints.
 However, you can make a simpler
version of this planter without having a shop full of tools. Except for the
wide bevels, all of the cuts can be made with a circular saw and a 10-in. miter
saw. Just make the top out of thinner stock and leave it flat (substitute
7/8-in.-thick cedar siding, the stuff with one rough and one smooth side, for
the top and the legs). You donÆt have to use biscuits in the miters. Keep the
pieces aligned by pin-nailing the corners and let the weatherproof glue hold
the joint. A drill, hammer and clamps complete the gotta-have tool list.
However, you can make a simpler
version of this planter without having a shop full of tools. Except for the
wide bevels, all of the cuts can be made with a circular saw and a 10-in. miter
saw. Just make the top out of thinner stock and leave it flat (substitute
7/8-in.-thick cedar siding, the stuff with one rough and one smooth side, for
the top and the legs). You donÆt have to use biscuits in the miters. Keep the
pieces aligned by pin-nailing the corners and let the weatherproof glue hold
the joint. A drill, hammer and clamps complete the gotta-have tool list.
|
|
|
Fasten
the legs with the box upside-down. Keep the legs flush
with the top of the box, and the planter will sit square. Apply glue and hold
the leg with a clamp so it doesnÆt slip when you drive the screw. Flip the
assembly over and install another screw near the top. Remove the clamp and
move on to the next leg |
|
|
|
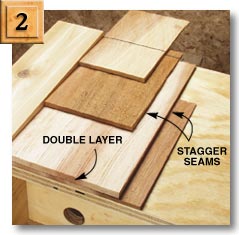
Install
the shingles in four courses. |
![]()
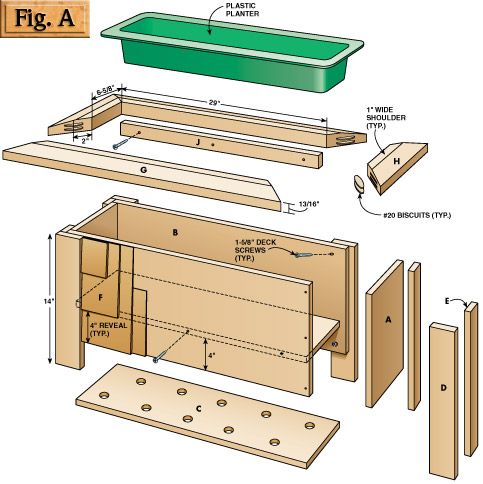
- Cut plywood box pieces to size.
- Assemble the box. Exterior-grade plywood
is often twisted, so clamp the ends (A) between the sides (B) to help get
all the edges flush. Fasten one corner at a time and drill pilot holes
before driving the screws.
- Square up the box by installing the bottom
(C).
- Glue the L-shaped legs (D and E) together.
Square the ends and trim them to 14-in. final length.
- Fasten the legs to the box (Photo 1).
- To match the scale of the planter, the
shingles (F) have to be made smaller. Shorten them all to 8 in., measuring
from the thin edge, except for the second course, which runs full length (Photo
2). Trim the shingles to width as you go and stagger the seams. Keep the
fasteners coveredŚthose on the last course are protected by the
overhanging top.
- Mill the top pieces (G and H, Fig. A).
Clean up the wide bevels by sanding or planing, after cutting them on the
table- or bandsaw.
- Measure under the rim of your plastic planter to determine the correct size for the opening in the top. Make adjustments to the dimensions given in the Cutting List and Fig. A, if necessary.
- Cut the miters. Measure from the inside
edges. Make sure both pairs of pieces (sides and ends) are the same
length.
- Reinforce the miter joints with #20
biscuits (Photo 3).
- Glue up the top (Photo 4).
- Add cleats (J) and install the top.
|
|
|
|
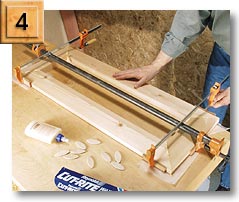
Cut stacked slots for
biscuits, to reinforce the miter joints. Use a spacer to lift the second slot
above the first. |
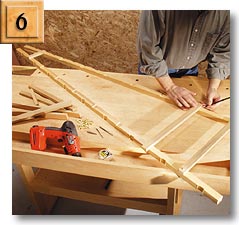
Glue the mitered top
on a flat surface. Draw the joints together by alternately adjusting the
pressure on the three clamps. Waxed paper keeps the top from gluing itself to
your bench! |