The first in a new furniture line
designed to commemorate 100 years of POPULAR MECHANICS.
TEXT AND PHOTOS BY NEAL
BARRETT
Illustration by Eugene
Thompson
No woodworker of 100 years ago could have guessed
what lay in store--what amazing new tools and materials
waited in the wings. Who could have known that compact,
powerful electric motors would come to dominate every
basement workshop activity? And that manufactured panels
and lumber, new adhesives and plastics would literally
change the shape of our homes, the things we make for
them and the way we build it all?
No one could have known--but there was one sure way
to keep up. With each issue, POPULAR MECHANICS brought
the latest in technology, tools, products and projects
into homes and workplaces across the country. It was
here, in these pages, that woodworkers just like you
pored over plans and instructions for building
everything from bookcases to speedboats. For millions,
POPULAR MECHANICS took the mystery out of making, and
empowered whole generations, giving them confidence to
"do it themselves." Now, with 100 years under our belt,
it's time to celebrate. And what better way than with a
set of matching furniture projects specifically designed
for the occasion.
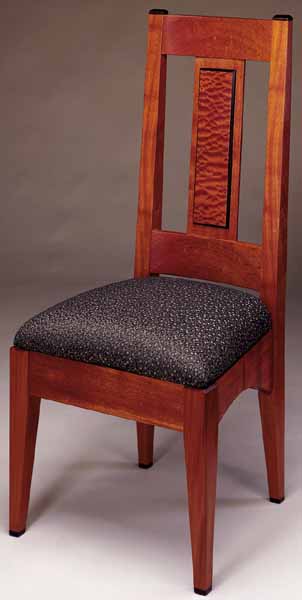
The first in our series is this elegant side chair,
and it sets the tone for each succeeding furniture
project throughout the year. With bows to both the Arts
& Crafts and Art Nouveau styles, we've created a
contemporary design theme that's compatible with any
decor. We've chosen mahogany as the primary wood. But
instead of the typical dark stain that many are familiar
with, we opted for a natural oil finish that gently
darkens with use, turning a golden, reddish brown.
In addition to the mahogany, we used two exotic woods
to create tasteful decorative accents: wenge, a heavy,
dense, dark wood, and pomele sapele veneer, a
mahogany-like wood with a heavily quilted grain figure.
Both of these materials are available through mail-order
suppliers. One such supplier is A&M Wood Specialty Inc.,
358 Eagle St. N., Box 32040, Cambridge, Ontario, Canada
N3H 5M2; 800-265-2759; www.amwoodinc.com.
We had an upholsterer provide the slip seat for our
chair. This is the place where you can add a personal
touch by selecting a fabric that blends with your home's
interior design scheme.
Нажмите на картинку для увеличения
MATERIALS LIST--CHAIR
Key
No.
Size and description (use)
A
2
1-3/4 x 3-3/4 x 43-3/4" mahogany
(rear leg)
B
2
2-1/8 x 2-1/8 x 16" mahogany
(front leg)
C
1
13/16 x 4 x 17-1/4" mahogany
(front rail)
D
1
13/16 x 6 x 13-5/8" mahogany
(rear rail)
E
2
1-3/4 x 4 x 13-5/8" mahogany
(back rail)
F
2
13/16 x 6 x 15-1/2" mahogany
(side rail)
G*
2
1/2 x 1-1/16 x 1-3/4" wenge (leg
cap)
H*
4
1/2 x 1-1/16 x 1-1/16" wenge
(foot)
I
1
3/8 x 5-1/2 x 17-5/8" mahogany
(splat)
J*
1
3/8 x 4 x 15" wenge (panel)
K*
1
4 x 15" pomele sapele (panel
veneer)
L
2
1 x 3 x 5-1/8" maple (corner
block)
M
2
1 x 3 x 5-9/16" maple (corner
block)
N
20
1-1/2" No. 8 fh woodscrew
O
4
3" No. 10 fh woodscrew
Misc.: Glue; wax paper;
120-, 220- and 320-grit sandpaper; 4/0 steel
wool; Waterlox Original Sealer/Finish (Waterlox
Coatings Corp., 9808 Meech Ave., Cleveland, OH
44105); slip seat provided by upholsterer.
* Finished dimension.
Cut oversize and trim after assembly.
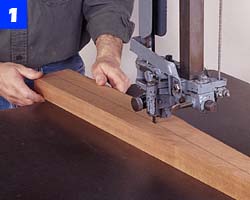
Start With The Legs Begin by making a
full-size template for the side profile of the rear legs
from a piece of 1/4-in.-thick hardboard or plywood. Use
the template to lay out the legs on 1-3/4-in. stock, and
cut to the waste side of the lines with a band saw
(Photo 1). Do not make the top and bottom cuts at this
time--it's more accurate to make these cuts after final
leg shaping.
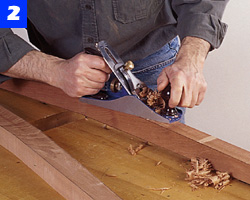
Use a plane to smooth the sawn surfaces and refine
the shape of the rear legs. Be sure to keep the planed
surfaces square to the leg sides (Photo 2). With the
shaping done, use a table saw and miter gauge to trim
the top and bottom of each leg. Then, rip stock for the
front legs to 2-1/8 in. square and crosscut these pieces
to 16 in. long.
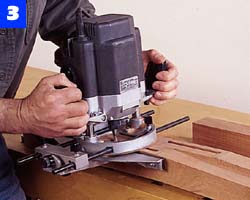
Lay out all the mortise locations on the legs.To make
this job more accurate, clamp two legs side by side and
mark them together. Then, use an edge guide and a spiral
up-cutting bit to rout the mortises (Photo 3). Make each
mortise in two or three passes to avoid breaking the bit
or overloading the router, and finish by chopping the
ends square with a sharp chisel. Lay out the tapers on
the front chair legs, use your band saw to cut the legs
to shape, and plane the surfaces smooth.
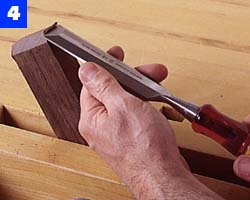
Rip a blank of wenge to 1-1/8 x 1-13/16 in. and cut
it about 8 in. long. Use a sharp chisel to trim a
1/4-in. bevel around one end (Photo 4), and then cut a
1/2-in.-thick piece from the beveled end to produce a
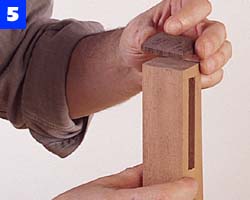
leg cap. Repeat the process for the remaining leg cap.
Apply glue to a cap and top end of a leg, position the
cap (Photo 5) and clamp it in place. When the glue
dries, sand the cap edges flush and adjust the chamfer
as required. Then, cut a wenge foot for each leg. Bore
and countersink a pilot hole in each foot and fasten
them to the legs with screws and glue. Sand the feet
flush, and slightly soften the bottom edges so they
won't chip.
Use a band saw to cut the rear leg
shapes. Keep the saw kerf on the waste side of the
layout line while cutting.
Smooth the cut surfaces with a hand
plane. Be sure to keep the planed surface square to
the adjacent faces.
Rout the leg mortises with a spiral
up-cutting bit. Another leg helps support the router
while making these cuts.
Use a chisel to cut a 1/4-in. bevel at
the top end of a wenge blank. Then, cut a leg cap
from the blank.
Apply glue, place the cap on the end of
the leg, and clamp. Sand the cap flush and adjust
the chamfer as necessary.
Making The Rails Cut 13/16-in.-thick stock
to size for the lower chair rails and use 1-3/4-in.
blanks for the curved back rails. Install a dado blade
in the table saw and use your miter gauge to cut the
tenons on the front and back bottom rails (Photo 6).
Readjust the blade height and hold the work on edge to
cut the tenon shoulders. When cutting the thicker
back-rail tenons, note that the depth of cut is
different on the front and back faces.
Mark the locations of the mortises in the edges of
the curved rails, and rout the mortises before you cut
the rails to shape. Square the mortises with a chisel.
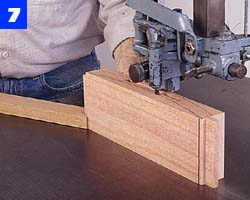
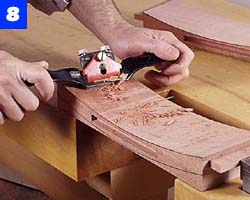
Use your band saw to cut the inside curve of the
rails (Photo 7). Then, clamp each piece to your bench
and use a spokeshave to smooth the cut faces (Photo 8).
Return to the band saw to cut the outer curved faces,
and smooth with a spokeshave or plane.
To cut the angled side-rail tenons, first construct a
jig for the table saw as shown in the Angled-Tenon Jig
detail in the drawing. Build a ramp to support the rails
at the 9° tenon angle, and screw the ramp to a 1/4-in.
plywood base. Attach a solid wood back to the base
behind the ramp and clamp the jig to the table saw miter
gauge. Install a dado blade and cut one side of each
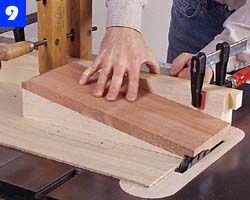
joint with the ramp sloping down to the blade (Photo 9).
Reverse the ramp to cut the other side of each tenon.
Because the angle will raise the rail end high above the
table, use a normal 10-in. blade and repeated cuts to
finish each tenon.
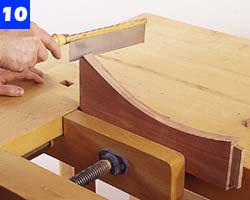
Lay out the curved shape on the side rails and cut to
the lines. Smooth the edges with a spokeshave and use a
dovetail saw to cut the shoulders at the top and bottom
of each tenon (Photo 10).
Install a chamfer bit in your router, and bevel the
bottom outside edges of the rails as shown in the
drawing.
Use a dado blade to cut the rail tenon
faces. Turn the stock on edge and readjust blade to
cut tenon shoulders.
After cutting the curved-rail tenons and
splat mortises, cut the inner curve on the back
rails with a band saw.
Use a spokeshave to remove saw marks on
the inside face of the curved rails. Then, cut the
outside face and smooth.
Build a ramp to support the side rails
when cutting the angled tenons. Reverse the ramp for
the opposite tenon faces.
Clamp a side rail in your vise and use a
dovetail saw to cut the shoulders at the top and
bottom ends of each tenon.
The Veneered Panel Cut the back splat to
size and check that it fits snugly in the back-rail
mortises. Use your band saw to resaw a blank of wenge
just slightly thicker than 3/8 in. for the decorative
panel core. Then plane the sawn surface smooth and to
finished thickness. Leave the blank at least 1 in.
oversize both in width and length.
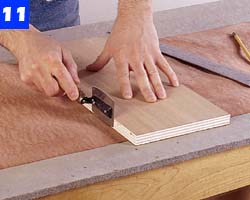
The simplest way to cut veneer is with a veneer saw.
This is a small saw with fine teeth that are beveled on
only one side. Hold the flat side of the saw against a
straightedge guide while you make several passes to cut
through the veneer (Photo 11). Apply light pressure so
you don't tear the veneer at the edges. Cut your veneer
to the exact size of the wenge blank.
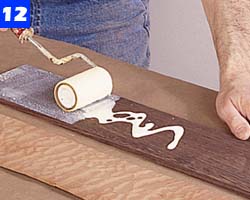
Use a foam roller to apply glue to the wenge blank
(Photo 12). For this small veneered panel, use regular
yellow glue--for a larger panel, slower-setting glue is
recommended. Cover the entire surface with glue, but
don't spread so much that it pools. Place the veneer on
the glued face aligning its edges with those of the
wenge. Place a sheet of wax paper over the veneer, then
sandwich the blank between cauls of 3/4-in. plywood.
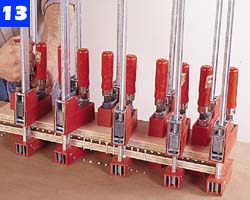
Apply clamps, working from the center toward the ends
(Photo 13). Allow the glue to set for a few hours before
removing the clamps. Let the panel dry overnight.
Trim the veneered panel to size and bevel the edges
with a router. Sand the back splat and panel to 220 grit
and lightly mark the position of the panel on the splat
with a pencil. Apply a light coat of glue on the mating
surfaces, then position the panel and clamp it to the
splat.
Use a veneer saw, guided by a straight
piece of wood, to cut the veneer. Finish the cut in
several light passes.
Use a foam roller to spread glue on the
wenge panel. The glue must cover the surface, but
shouldn't pool.
Starting at the center, apply clamps
along the panel. A modest amount of glue will
squeeze out along the edges.
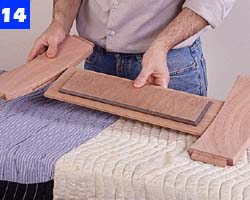
Assembly Sand all the parts, finishing with
220-grit sandpaper, and join the splat to the curved
rails (Photo 14). You don't need glue at these joints
since the splat is held captive between the rails. If
the joints are excessively loose, though, use a drop of
glue in each mortise to keep the splat from rattling.
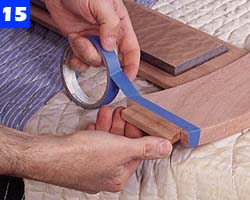
Wrap the ends of the rails with masking tape where they
join the legs to keep glue from drying on the wood
surface (Photo 15).
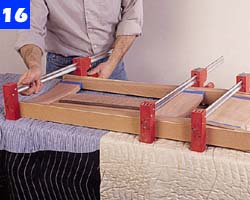
Spread glue on the back-rail tenons and leg mortises.
Join the rails to the legs and add clamps to pull the
joints tight (Photo 16). Then, join the front rail to
the legs.
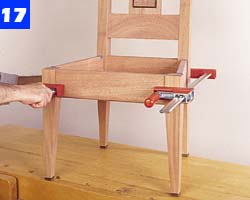
Complete the base by joining the front and back leg
subassemblies to the side rails. Stand the chair on a
flat table so you can be sure that all the legs rest
evenly (Photo 17).
Make the 1-in.-thick corner blocks, bore and
countersink pilot holes for mounting them, and bore
holes for attaching the seat. Then, screw the blocks to
the chair rails.
Finishing We used Waterlox Original
Sealer/Finish for our chair. Apply it with a brush or
rag and let it soak in for about 30 minutes. Use a
lintfree rag to wipe off the excess and let it dry
overnight. Lightly scuff the surface with 320-grit
sandpaper and dust off before applying a second coat
using the same technique. After overnight drying, apply
the third and final coat. Rub the dried finish with 4/0
steel wool to give it a soft, satin shine.
Begin assembly by joining the splat to
the back rails. You don't need to use glue unless
the joints are loose.
Protect the sanded parts from glue
squeeze-out during assembly by applying masking tape
at the rail ends.
After applying glue to the
mortise-and-tenon joints, clamp the rear legs to the
rails to pull the joints tight.
Join the front and rear subassemblies to
the side rails. Stand the chair on a flat table and
check that all legs rest evenly.