Nested Boxes

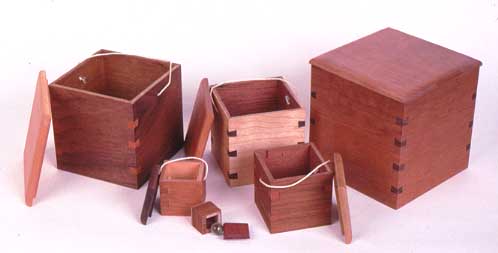
Can you think of a better way to pop the question? She'll think you're a nut by the time she gets to the fourth box, but when she gets to the sixth, you'll be a nut worth marrying. Substitute a piece of candy or a marble for the ring, and you have an excellent gift for a youngster. Whatever you put in the last box, the recipient will have a lot of fun finding it.

This is a good project for using up smaller miscellaneous scraps. I used a bunch of pieces of 1/4" hardwood veneer plywood that I just couldn't throw away, but were too small for anything else. If you plane or resaw 3/4" thick stock down for this project, be sure to start with pieces at least 18" long for safety while planing or resawing. Bring them down to 1/4 or 3/8" in thickness. The exact thickness isn't critical.


Make the outside dimensions of the box parts in inch increments. The large box parts are 6" square, the next are 5" square, then 4, 3, etc. First rip your stock to these widths on the table saw. Do this with the blade at 90o, ripping on the long grain on the edges of the stock. Now set up your table saw cutoff box with the blade tilted to 45o to cut the miters on the ends on the parts. Use a toggle clamp to hold the parts in place as you do, not your fingers. This will require moving the clamp half way through because of the different widths- but- safety first.

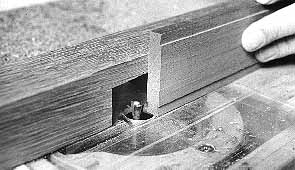
Use 1/8" plywood for the box bottoms. You could also use 1/4" plywood if that's all you have, or even stiff cardboard. Cut a groove on the bottom inside edge of the box sides for the bottoms to fit into at the table saw or router table. Note that I didn't even try to do this with the tiny box- I just glued the bottom directly onto the bottom edge of the sides. Locate the groove at least 3/16" above the bottom edge of the sides, and make its width match the thickness of the bottoms. Use a push stick to help guide the parts across the cutter.

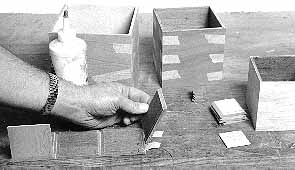
To glue the four sides of each box together, first lay them out with tape on three of the four joints as shown in photo 1. Apply glue to the eight mitered edges, place the box bottom in its slot, and fold the box together. Finally, tape together the fourth joint. Be sure that all the corners line up well and that each box is close to square before setting it aside to dry.

Photo 1- To glue together each box, first lay out all four sides adjacent to each other as shown with masking tape attaching them on the outside. Apply glue to the miter joints, place the bottom in its groove, and fold the box together. Tape the last joint together.

Cut the dovetail key joints in the box corners with a router table setup as shown in photo 2. To make this jig, cut a 45o angle into a piece of lumber at least 1-3/4" thick and 18" long at the table saw. Attach this fence to your router table miter gauge as shown in the photo so that there is at least six inches of the fence on either side of the router bit. Raise the bit to a height equal to the width of the miter cuts. Use this setup as shown to cut the slots on the miter joints. You must hold the box firmly on the 45o fence during the cut, or the bit will push it to the side as it cuts.
Photo 2- Attach a 45o block to your miter gauge and set it on your router table. Use this to steady the box as you push it over a dovetail bit as shown. Keep your fingers out of the path of the bit.

Do not put your fingers inside the box on the miter joint itself. Always keep your fingers above the height of the bit on the 45o fence, and to one or the other side of the bit. When you do the smaller boxes, put your fingers on the box sides that are facing upward. Don't hold the 1" square box by hand on this jig. Use a toggle clamp to hold it in place if you want to give it dovetail keys, but it's so small that it doesn't need the extra joinery.

Make keys to fit the slots at the router table with the same dovetail bit as shown in photo 3. Start with stock that is slightly thicker than the widest point in the slots, and adjust the location of the router table fence to make the keys fit snugly in the slots. Start with pieces at least 2 x 12", then rip the keys off at the table saw with a push stick. Cut them to 1" long, glue in place, then trim them flush to the box sides with a chisel.

Photo 3- Make dovetail pieces that will fit the slots on the boxes with this setup on the router table using the same bit. Rip the dovetailed edges off the stick, cut them into short lengths, and glue into place on the box corners. When dry, trim them flush with a chisel.

Make solid lids with rabbets to fit, and drill holes for string handles. These are necessary, since there's no other way to get the boxes out of each other.
Hosted by uCoz