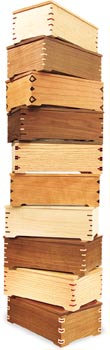
 Keepsake Box
by Mac Wentz
As the holidays approach, my thoughts turn to how I can weasel out of
gift shopping. And this year I have the perfect scheme: While the malls are
jammed with poor saps, I'll be in my shop blissfully building these boxes for
everyone on my list.
When
they marvel at the elegant keyed joinery at the corners, I won't mention how
fast and easy these boxes are to make. Making the jigs and resawing lumber
takes a few hours, but once you're set up you can churn out three or four boxes
in a day. There's no need to mention how cheap the materials are either. If you
stick with common species like oak, cherry or maple, each box will cost only
$10 to $15.
Tools and Materials
The box shown at left is made from 3/8-in.-thick wood, so I used a bandsaw for
resawing and a planer to take the wood to final thickness. For more information
about resawing, check out "Bandsaw Resawing," AW #81, August 2000,
page 46.
If you don't have a bandsaw and planer you can also mail order 3/8-in. wood
(see Sources at end of story). You'll also need a tablesaw, belt sander, router
table, 1/8-in. and 3/4-in. straight router bits and some 3-in. spring clamps.
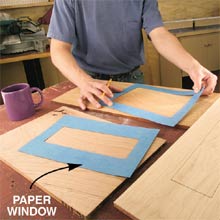
Start With Grain Selection
Grain pattern has a big influence on the appearance of a small project like
this box, so don't just rip up boards and leave it to chance. Begin by making
paper windows that let you preview the look of the box parts (Photo 1). I
generally use finer, straighter-grained material for the ends and sides and a
more dramatic pattern for the top. This is not a hard and fast rule, so
experiment until you get something you like. Grain pattern for the bottom isn't
critical, since it doesn't show. For the keys I use a different color wood so
they contrast with the box.
Cut the Sides
I strongly recommend you miter the box sides on a tablesaw using a tablesaw
sled (Photo 2). The every-time accuracy of a well-made tablesaw sled is hard to
beat. In fact, I built a small one just for building these boxes. For more
information on making a sled, see "The Ultimate Shop-Built Crosscut
Sled," AW #75, October 1999, page 38 (for reprints, click here). Cut the parts for the ends and sides and make an extra set to test
your machine setups later on.
Next cut the dadoes in the ends and sides for the bottom (Fig. A, page 55). The
dadoes should be wide enough to provide an easy fit for the bottom.
Now select two ends and two sides that have the least attractive grain and mark
them "GP" for guinea pig. These GP parts are the first to go through
each step in the machining process and hopefully the only ones to suffer from
setup mistakes. Beginning with the GP parts, rout the relief in the bottom of
the ends and sides to form the corner feet using a 3/4-in. straight router bit
in your router table (Photo 3).
|
|
|
PHOTO 1: |
|
|
|
PHOTO 2: |

|
|
|
PHOTO 3: |
The Bottom and Top
Cut the bottom for the box next. The bottom is about 1/16-in. undersize to give
it some room for expansion. Next cut the top but don't cut the rabbets until
the box is assembled. That way you can custom fit the top for a
snug-but-not-too-snug fit.
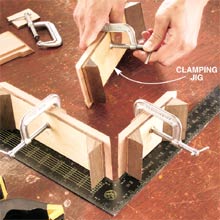
Clamping Jigs Make Glue-Up a Cinch
Assembling the box begins by making a set of clamping jigs. They are simply
made from scraps of 1/4-in. plywood that have 45-degree beveled blocks glued to
them (Photo 4). Make them 3/4-in. shorter than the outer dimensions of the box
so they don't interfere with assembly. The advantage of these clamping jigs
over other clamping methods is that you can deal with each joint independently,
avoiding the frantic rush of trying to align, clamp and square all the corners
at once.
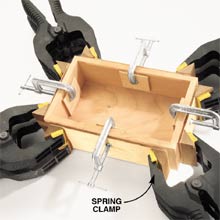
Do a full dry assembly to make sure the jigs and box parts come together
correctly. Then disassemble the box and sand the bottom and the inner surfaces
of the ends and sides. Add the jigs, glue and spring clamps to the miters
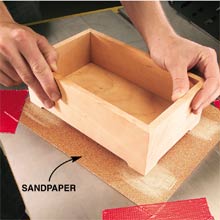
(Photo 5). Assemble a guinea pig box too, using the GP parts. Once the glue is
dry you can level the feet (if they need it) on a piece of sandpaper (Photo 6).
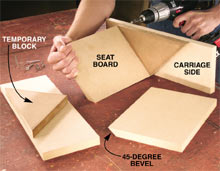
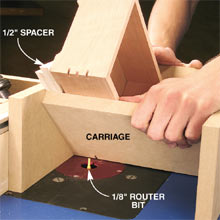
Cutting Slots With a Carriage
To cut slots through the box corners, build a carriage that holds the box at a
45-degree angle as it passes over the 1/8-in. router bit. The carriage is just
four pieces of plywood or MDF. See the Parts List, page 57, for dimensions. The
two seat boards have a 45-degree bevel on the bottom edge (Photo 7). For
stability and safety, I like a carriage that's wider than the box.
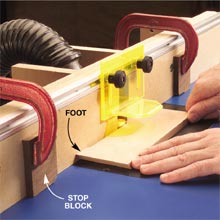
Assuming your carriage is made from 3/4-in. material, set your router table
fence 2-1/4-in. from the center of the 1/8-in. router bit (see Sources, page
57). This will position a slot right in the middle of the box. Cut all four
middle slots. Then use a 1/2-in. spacer board to reposition the box for the
next set of slots (Photo 8). Use a second spacer board for the final set of
slots. Using spacer boards eliminates the need to move the router table fence
for each set of slots. You will, however, have to reset the height of your
router bit for each set of slots and this may require some trial and error
testing. This is where the guinea pig box comes in handy.
|
|
|
PHOTO 4: |
|
|
|
PHOTO 5: |
|
|
|
PHOTO 6: |
|
|
|
PHOTO 7: |
|
|
|
PHOTO 8: |
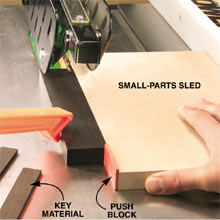
Cut, Glue and Sand
Keys
Rip the 1/8-in.-thick key material using a small-parts sled on your tablesaw
(Photo 9). Cut scrap material first, readjusting the fence until you end up
with key material that slips smoothly into the slots in the corners of the box.
Make sure to use a zero-clearance insert to prevent the strips from falling
down into the saw next to the blade. For more information on zero-clearance
inserts, see "Soup Up Your Shop," AW #91, December 2001, page 41 (for
reprints, see page 3).
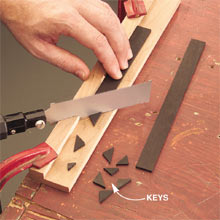
Cut the key material into triangles with your bandsaw or a small handsaw (Photo
10). Cut the triangles about 1/8-in. oversize. When gluing the triangles in
place, use glue sparingly and make sure you fully seat each key into its slot
(Photo 11).
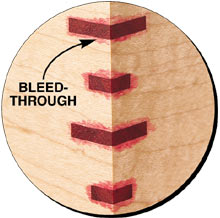
Sanding the keys flush with the box sides is fun because you finally see the
decorative effect. It's also scary because it's easy to mess up a mitered
corner or gouge a side of the box. My tool of choice for this operation is a
belt sander mounted upside down on my bench and equipped with a 120-grit belt.
To prevent gouging make sure to keep the box parallel with the sanding belt
when sanding.
Finishing Touches
All the boxes shown in this article got a final sanding with 180-grit sandpaper
followed by a couple coats of spray lacquer. Spray lacquer is available at
hardware stores for about $7 per can. One can is enough for three or four boxes.
|
|
|
PHOTO 9: |
|
|
|
PHOTO 10: |
|
|
|
PHOTO 11: |

|
|
|
Oops! |