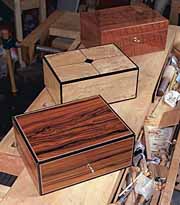
Building a Humidor
Maintaining tropical humidity in a box takes precise joinery and Spanish cedar
You can smoke a dry cigar, but you won't enjoy it. It will burn too hot, making the smoke acrid and unpleasant. Most of the flavor and all the subtleties of the tobacco will be lost. Cigars are made in the tropics where the relative humidity is a constant 70%, and they should be kept at that level. The relative humidity in Southern Idaho, where I live, is about 30% in the summer, and lower in the winter -- a really hostile environment for cigars. I have had cigars dry up, even unwrap, four hours after I bought them.
A properly functioning humidor is a necessity for enjoying good cigars anywhere outside of the tropics. With only monthly upkeep, a well-made humidor will preserve cigars indefinitely. Very fine cigars even improve when aged in a humidor.
Building a humidor that works is not as simple as making a nice box and fitting a humidification device in it. This is often how they're made, and the results are cigars ruined from too little or too much moisture. Maintaining 70% humidity is a balancing act that depends in large part on the wood you use and the tightness of the lid's seal. It's not rocket science, but making a good humidor takes some care in design and execution.
Why use Spanish cedar?
The wood you choose to make and line the humidor is particularly important. It should not have an unpleasant smell or taste because the cigars will pick it up. The wood also should be porous so it will first absorb, then release moisture evenly, while remaining dimensionally stable. The wood will reach 70% moisture content on the inside, while the humidity on the outside could be as low as 20%. For many woods, this is a recipe for severe cupping.
Spanish cedar is the traditional and best choice for a humidor. When kiln dried, it is very stable and will not warp or grow much when it reaches 70% moisture content. Its oils inhibit the growth of molds and mildew that destroy cigars. Spanish cedar has a delicate aroma that is complementary, enhancing the cigar's taste.
Spanish cedar does have one serious problem: bleeding sap. It will ooze out of the wood, stick to your cigars and ruin them. Pieces that look sap-free can bleed many months after the humidor is finished. Common advice is that South American cedar (Cedrela fissilis) has a sap problem, and the Central American varieties (Cedrela odorata and C. mexicana) do not. However, I have found little difference between them. There are ways to reduce the problem with sap. The thinner you slice the cedar, the less sap the piece will bleed later. Kiln drying, if well done, will set the sap. And if you do get some sap on the surface, acetone or lacquer thinner will take it off.
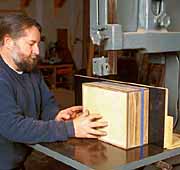
One-sided veneering for the basic box
 | |
|
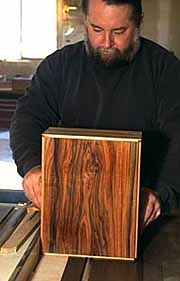
Humidors are not just pretty
boxes. They need to be carefully constructed if they are to
maintain the right humidity for cigars. | |
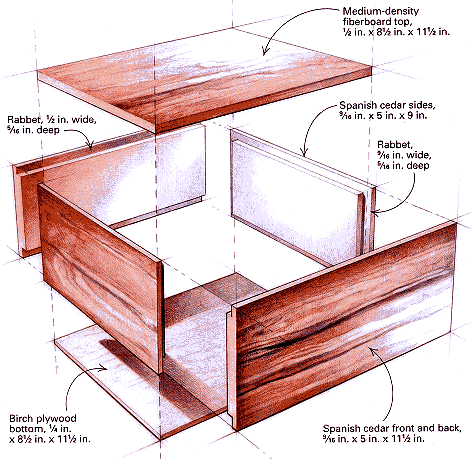
The most common box size I make is 12 in. by 9 in. by 5 in. with internal dimensions of 10-1/2 in. by 7-1/2 in. by 3-5/8 in. It will store about two boxes of cigars, 50 in all. Cigars range from 4-1/2 in. to 8 in. long and 35 to 52 ring size (about 1/2 in. to just over 3/4 in. dia.). Most commonly, however, they are about 6 in. long by 42 ring. If you buy a much longer cigar, it can go in sideways.
|
||||||||
Now, I know we all have been taught to veneer both sides of anything, but this is an exception. Perhaps it is a combination of things that makes it work: the stability of the cedar, the stability of the box construction, the constant humidity on the inside, the lacquer finish on the outside. Anyway, it works. I have never had a box come apart using this technique.
 |
 | ||
|
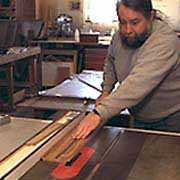
Rabbet the four sides at once,
while they're still one piece. A dado blade will make the cut in
one pass. |
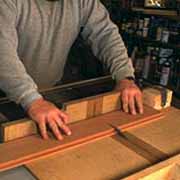
Cut the rabbeted sides apart and
to length on the tablesaw. Use a stop block to ensure consistent
lengths. | ||
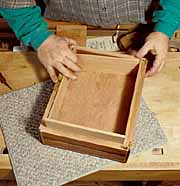
I dry-clamp the front, back and sides together with several band clamps. Only at this point do I carefully trim the top and bottom to size in a crosscut box for an exact fit. The joints of the top and bottom provide a great deal of strength to the humidor and should be right on.
After the dry-fitting, I glue the box together. I use a reactive polyurethane glue from Custom-Pak Adhesives (11047 Lamb's Lane, Newark, OH 43055; 800-454-4583; http://www.custompak.com/) because it is waterproof, sets slowly enough to make clamping up a stress-free job and has a clamp time of just over an hour.
Waterproof glue is a necessity on the corner joints because they will eventually live in a high moisture environment. Even the waterproof type II polyvinyl acetate (PVA) glues will eventually let go if exposed to so much water for long. At the same time, I have used regular PVA glue for the veneering, edge-banding and inlay without a problem. Because the polyurethane glue is activated by moisture, I spray a little water on the joints before gluing up the box.
 | |
|
Tablesaw makes the edge-banding
and inlay joints a cinch. Four cuts along each edge create the
necessary joints. | |
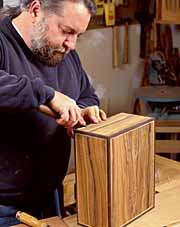
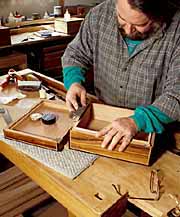
Spanish cedar is a soft, lightweight wood, and the veneer isn't much more durable. I use a hard, solid wood edging for protection against the dings and dents that come with everyday handling. I add inlay along the edge-banding for contrast. The result is visually pleasing and reasonably durable.
After the box has been glued together, I cut rabbets along each edge of the box for the edge-banding (see Rabbets for edge-band and inlay). I make the rabbets 1/4 in. by 1/4 in. along the top and sides. And I make them 1/4 in. by 1/8 in. deep on the bottom because the edge is thinner.
Along the cuts for the edge-banding, I make a second series of cuts for the inlay, 1/8 in. wide and 1/16 in. deep. The veneer on the edge of these cuts cannot have any breakout. I use an alternate-bevel, 80-tooth blade to cut the cross-grain rabbets and a 24-tooth flat-top blade to cut the long-grain rabbets.
 | |
|
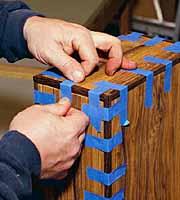
Yellow glue and tape attach the
edge-banding. Wenge edge-banding is butted at the corners, not
mitered, because end grain is not conspicuous. | |
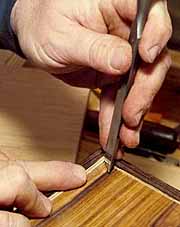
When the edge-banding sets, I remove any squeeze-out from the inlay grooves with a small chisel. I cut the one-piece inlay to length and miter each corner. Then I run a bead of yellow glue down the groove and press in the inlay with the back of a chisel. Don't bother trying to clamp it in; the press-fit should hold it in place. When it dries, I plane the edge-banding level with the inlay and veneer, round the edges and file down the end grain on the corners. Then I use a cabinet scraper to smooth the whole box.
 |
 | ||
|
Press the inlay into the groove
with the back of a chisel. It should not need clamping or
taping. |
Fine-tune the miter if
necessary. | ||
 | |
|
Saw off the top of the box on a
bandsaw. Tape the entire saw line, and use a 1/2-in., 3-tpi
blade to avoid breakout. | |
I use a tall fence and set it so the top will be 1-5/8 in. thick. Then I cover the cut line with masking tape to prevent breakout. With a careful push through the saw, it's done. I use a cabinet scraper to smooth the edges and make them perfectly flat. Ideally, the joint should be hard to distinguish when the box is closed. I use Brusso quadrant hinges (available from Whitechapel Ltd., P.O. Box 136, Wilson, WY 83014; 800-468-5534) because they are well made, look nice and are strong enough to keep the heavy lid from going anywhere. I install a box lock with a flush escutcheon on the outside.
The lining creates the seal
 | |
|
Gently press-fit lining around
interior. When you season the humidor, the lining will swell and
lock itself in place. | |
Before I fit the lining, I spray a coat of flat lacquer on the inside of the box except along the top and bottom edges. The lacquer slows down absorption of moisture into the joints when seasoning the humidor and slows down the release of moisture when the cigars are in it. The corner joints will appreciate the reduction in stress.
I install the top and bottom pieces of lining first. I cut them to fit snugly in length but leave a gap of 1/8 in. to 3/16 in. on the sides for cross-grain movement. The lining for the sides in the bottom half of the box should extend above the edge by about 3/16 in., and the lining in the top should be recessed by about 1/4 in. (less if you desire a tighter seal). Next I install the lining along the sides of the top and the bottom: front and back pieces first, then the shorter sides. One thin bead of yellow glue down the middle of each piece will keep them centered during assembly.
 | |
|
Careful with that bevel angle.
It determines the rate the humidor loses humidity and receives
fresh air. A humidor that is opened frequently should have a
tighter fitting lid. | |
If you will be opening the humidor every few days, make the seal tight so that a dropped lid will float closed on a cushion of trapped air. If you won't be opening the humidor very often, make the seal less tight to help keep the air from becoming too damp.
Opening and closing should be easy, and you should just feel the lining touching on the lid as it shuts. For a tight seal, cut a steep bevel on the lining in the bottom of the box, and for a loose seal, make the bevel lower. The front needs more of a bevel than the sides and back so the lid opens and closes properly. I bevel all sides for even breathing and to maintain a continuity of style.
Finishing the humidor and installing a humidifier
|
|||||||||||
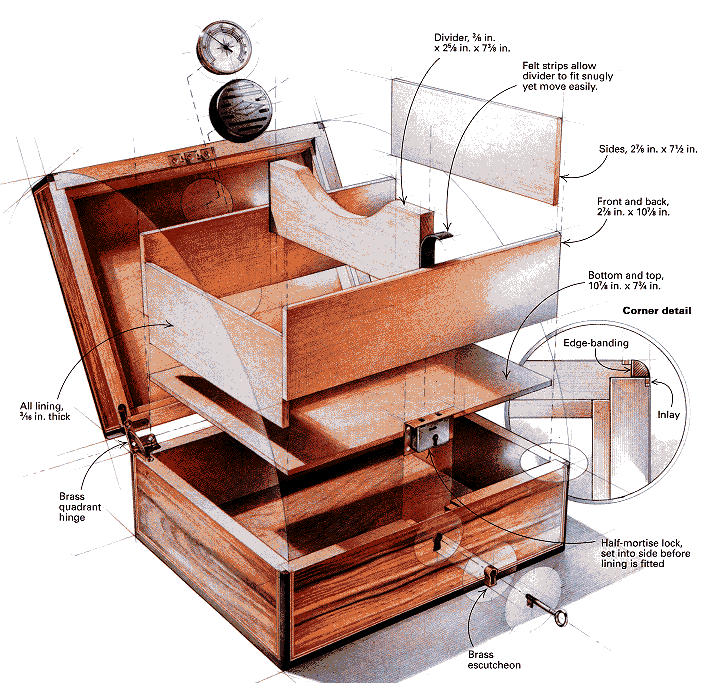
The humidifier provides a source of moisture in the box. Most humidifiers are extremely simple. A sponge-like material, often florist's foam, is contained in a plastic or metal vented case. Because moisture from the humidifier falls, I attach the humidifier to the center of the lid for the most even distribution.
To help the humidifier stay put, I seal the cedar right behind it with lacquer. Even with the humidifier at the top of the box, the bottom will be more humid. If you leave cigars in your humidor for a long time, rotate their position once a month.
The humidifier I prefer to use is the Nonpareil (available from Beall Tool Co., 541 Swans Road N.E., Newark, Ohio 43055; 800-331-4718; http://www.bealltool.com/). It is made of anodized aluminum and uses a removable and easy-to-clean urethane foam pad. This eliminates the need to mess with distilled water because mineral deposits that would otherwise clog the humidifier can be washed out. Many humidifiers do not come apart for cleaning.
Before you put any cigars in your humidor, it's essential to season it first. After I fill the humidifier, I put a cup filled with wet paper towels in the closed humidor. It will take a few days for the box to reach 70% moisture content.
To monitor the humidity level of your humidor, you can attach a hygrometer (available from Woodcraft Supply, P.O. Box 1686, Parkersburg, WV 26102; 800-225-1153) to the bottom of the lid in the same way that you did with the humidifier. Remember that dial hygrometers are rarely accurate. The feel of the cigar is always the best measure of a properly functioning humidor. A good cigar should feel soft but not spongy or crunchy.