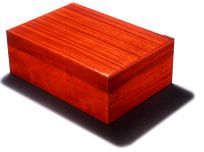
If you enjoy a fine cigar, and the fragrant smoke
that comes only from a fresh one, you should make this
attractive humidor -- it keeps your cigars in peak
condition. Not only is it a pleasure to build, it's a
pleasure to use. Every time you open it, you'll be
greeted by the inviting aroma of fresh tobacco stored at
the correct humidity.
It's constructed of solid mahogany and ribbon-stripe
mahogany veneer. Dimensioned to hold 50 cigars, it's
fitted with a humidifier to provide relative humidity of
about 70 percent. It's also fitted with a dial
hygrometer that indicates the percentage of humidity
present in the humidor.
If you're not a cigar smoker, you might want to
consider this project anyway. Its high-luster finish,
fine brass hardware and elegant construction make it an
attractive case in which to store coins, stamps, jewelry
or cutlery.
Construction
Begin by thickness planing stock to 1/2 in. for the box and
1/4 in. for the tray. You can also order material of this
thickness from Constantine's, 2050 Eastchester Rd., Bronx,
NY 10461. The company also carries veneer.
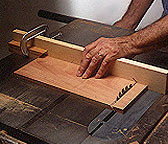
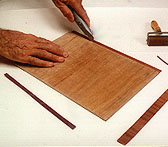
Rip and crosscut the stock for the sides and ends
slightly overlength. Next, miter one end of each piece.
Make a stopblock with a 45 degree end and clamp the
block to the miter gauge fence with the miter face down.
Then, gently butt each mitered workpiece against the
mitered stopblock and make the cut (Photo 1).
1 -- Cut the
miters on the sides and ends, using an auxiliary fence
and a 45 degree miter stopblock clamped in place.
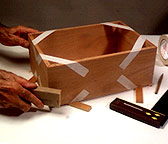
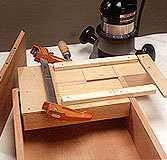
Tape the pieces together and check their fit. Dull
the fragile outside corners by hand sanding (Photo 2).
2 -- Test fit the
sides and ends. Tape the pieces together and remove the
sharp corners by hand sanding.
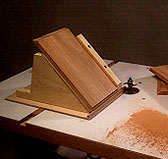
The sides and ends are held in a 45 degree jig as
they are moved over the slot-cutting bit in the router
table (Photo 3). Next, cut the panel rabbets slightly
overdepth to allow the rabbet to be trimmed flush to the
panel.
The splines are cut from 1/8-in.-thick plywood shaved
to 5/64 in. thick. To do this, cut a strip of plywood
5/16 in. wide and 24 in. long. Its face grain should run
across its width. Attach this strip to the edge of a
3/4-in.-thick board using artist's rubber cement, not
contact cement. Apply the cement to one surface only.
Adjust the table saw fence to shave 3/64 in. off the
strip. Carefully peel off the spline stock and rub off
any residual cement.
3 -- Use a sliding
jig and slotting cutter in the router table to cut the
spline slot. Make a test cut first.
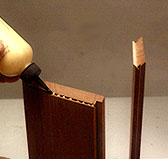
The humidor is assembled with waterproof glue. We
used Franklin's Titebond II, a rapid-setting type.
Spread it sparingly in each slot and on the miters,
using a hair-colorant squeeze bottle (Photo 4).
4 -- Apply glue
sparingly and evenly in the spline slots. Use a
hair-colorant squeeze bottle with a fine nozzle.
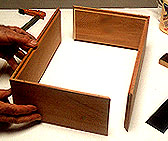
Make two L-shaped subassemblies and apply pressure
with six bar clamps (Photo 5 and 6).
5 -- Make two
L-shaped subassemblies, each comprised of a side and an
end. Press the subassemblies together.
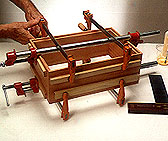
6 -- The
waterproof glue sets quickly, so six clamps and cauls
must be ready. Position the clamps and cauls as shown.
The top panel must fit precisely, so cut a template
out of cardboard, test fit it (Photo 7) and use it to
adjust the table saw fence.
7 -- Make a
cardboard template of the top panel. Test it in the
rabbet-it should fit in the space snugly.
Cut the pieces of panel veneer oversize by 1 in. in
width and length, and apply contact cement (Photo 8).
When one coat dries, apply a second. Bond each veneer
sheet to the panel with a roller.
8 -- Evenly apply
contact cement to the veneer and the plywood panels,
using a small bristle brush.
Use a utility knife to trim the overhanging veneer
(Photo 9). Make the end cuts first, and work from the
corners to the panel's center to prevent splitting out
the veneer. Veneer the panel's second side in the same
way, and finish sand the inside face with 220-grit
paper.
9 -- Use a sharp
knife to trim off the excess veneer. Cut from both ends
toward the panel's center to prevent tearout.
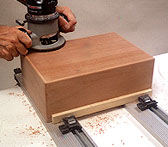
Glue and clamp the panels to the box body. Use a
router with a flush-cutting bit to trim the rabbets
flush to the panel, and cut the curve on the edges using
a 3/16-in.-rad. corner-rounding bit (Photo 10).
10 -- Using a
3/16-in.-rad. corner-rounding bit in the router, make
the crossgrain end cuts before cutting with the grain.
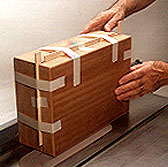
Now cut the lid off on the table saw. Raise the blade
so it projects about 5/8 in. above the table. Tape a
spacer strip into each kerf after it is cut. Keep in
mind that the thickness of the spacer strips should
equal the width of the saw kerf. Cut the ends first,
then the sides (Photo 11).
Before moving on to cut the hardware mortises, note
that the mortise dimensions and placements are based on
the hardware we used: The lid hinge is Stanley No.
73A70B, and it's available from Constantine's. The
Brusso lid support is No. 62166, and is available from
The Woodworker's Store, 21801 Industrial Blvd., Rogers,
MN 55374. The jig dimensions are based on routers with 5
3/4-in.-dia. bases.
11 -- Cut the lid
off the box on the table saw. Tape in a spacer strip to
support the lid after making each cut.
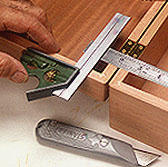
Clamp the hinge mortising jig to the box body, and
cut the mortises. Next, temporarily attach the hinges to
the lid and the humidor box. Note that the hole in the
lid and the mortise for the lid support are positioned
from the hinge pin's center. Use a ruler, square and
knife to mark the hole 1 in. from the pin's center
(Photo 12).
12 -- Use a ruler,
square and knife to lay out and mark location of
lid-support hole. Measure from the hinge pin's center.
To cut the lid-support mortises, clamp the jig to the
humidor body and then make the cut (Photo 13).
Temporarily install the lid-support hinges, and check
them for operation. If everything works okay, bore pilot
holes for the support's screws.
13 -- Cut the
mortise for the lid support using a router and jig. Try
the cut on a scrap piece first.
Making The Liner And Tray
Rip and crosscut the liner pieces, and cut miters on their
ends. Cut their curved edges using a 3/8-in.-rad.
corner-rounding bit. Adjust it so it leaves a small flat
area on the top edges.
Temporarily install the liner pieces in the box and check
the lid's fit on them. Hand sand high areas.
Apply a 1-in.-wide strip of glue along the sides and ends
of the box about 1 in. from the top edge. Press the end
liner pieces in place and slide in the front and back
pieces. After the glue has set, attach the tray supports
with glue and brads.
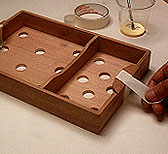
Rip and crosscut the tray pieces. Finish sand their inner
surfaces with 220-grit sandpaper, then glue and clamp the
assembly. Cut the plywood tray panel, and apply veneer to
its top. Finish sand the panel, bore the vent holes through
it and glue it to the tray.
Next, rip and crosscut one long piece for the tray
handles and notch it by running it over the table saw
with a dado blade tilted at 30 degrees. Saw the curved
outline on each handle. Sand a bevel on each of the
handles by taping it to a scrap block and pressing it
against a disc sander (Photo 14).
14 -- Cut the
curve and notch in the handle pieces, then sand the
taper on them, using a disc sander.
Glue and tape the handles to the tray (Photo 15).
15 -- After the
tray is sanded, apply glue on the handles and hold them
in place with masking tape until the glue sets.
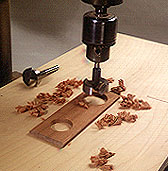
Instrument Block
Rip and crosscut the instrument block to size, then
bore the holes through it with a Forstner bit on the
drill press (Photo 16). Note that the holes have
different diameters. We had to enlarge the hole for the
humidifier to 11 3/16 in., using a sanding drum on the
drill press.
The humidifier is a clay disc set in an aluminum cup,
which attaches to the lid with a Velcro strip. It's
available from Atmos Products, 39 Central Ave.,
Harrison, NJ 07029. The humidifier costs about $3,
shipping included. The hygrometer is available through
Forecaster Wind and Weather Shop, 8 Front St.,
Greenport, NY 11944. It costs about $12.50, shipping
included. Be sure to specify gold or silver finish when
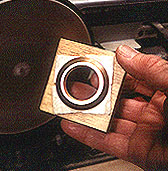
you order. To improve the appearance of the humidifier
and to provide a grip to lift it out, we made a brass
ring adapted from a cylinder lock collar. The lock
collar has a 1 7/8 in. outside diameter and a 1 1/4 in.
inside diameter. It costs about $1, and you can find
them at locksmith shops and at hardware stores that do
lock work.
16 -- Bore the
holes in the instrument block using a Forstner bit.
Enlarge the hole for the humidifier with a drum sander.
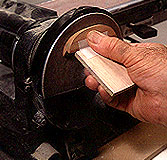
To make the ring, bore a 1 5/8-in.-dia. hole in a
3/4-in.-thick scrap block that's about 2 1/2 in. long on
each face. Secure the ring to the block with 3M
Heavy-Duty Mounting Squares. Press the collar against
the center of a disc sander (Photo 17). Hold it in place
until the center flange of the collar drops off. Then,
use a drum sander to remove the sharp edge left on the
flange by the disc sander.
17 -- To sand off
the center flange, the lock collar is secured to a scrap
block with adhesive mounting squares.
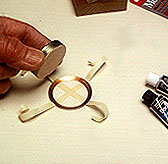
Next, apply a thin coat of quick-setting epoxy cement
to the inside of the ring to thwart galvanic corrosion
between the brass and aluminum. When this has set, tape
the cup to the ring (Photo 18) and apply a thin bead of
epoxy around the ring to hold it to the clay cup.
18 -- Seal the
flange with epoxy and let it set. Then, tape the flange
to the humidifier and fasten it with epoxy.
Finishing
To duplicate the finish we used, proceed as follows: Add
one part Behlen Solar Lux Retarder (Part No. 99P12.01) to 10
parts Behlen Medium Red Mahogany Stain (Part No. 99P03.04).
The retarder prevents lap marks. Apply the stain with a
brush and let it dry overnight.
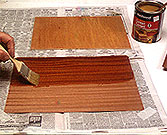
Next, apply Medium Red Mahogany Paste Wood Filler (Part
99P10.03) to the humidor's outside. Apply the filler with a
rag. When its shine has dulled, wipe across the grain using
a coarse cloth then wipe with the grain using a smooth
cloth. Allow the filler to dry for 24 hours. The stain,
retarder and filler are available from Garrett Wade, 161
Avenue of the Americas, New York, NY 10013.
We used Deft Semi Gloss Clear Wood Finish on the interior
and the gloss version of this product on the exterior. Apply
two coats to the inside of the humidor and the tray. Apply
four coats to the outside. Level and smooth the first and
second coats, if they need it, using 320-grit wet/dry
sandpaper on a rubber sanding block. Smooth the third coat
with 400-grit wet/dry paper lubricated with water. Rub out
the last coat with 600-grit wet/dry paper and water. Allow
each coat to dry for at least 4 hours before rubbing it out.
Rub down the humidor's outside with rottenstone (which is
also available from Garrett Wade) and water, using a felt
pad. Wax and buff the humidor's outside, and glue the
instrument block to the lid.
The humidor is reasonably heavy when filled with cigars, so
we suggest you apply felt to its base. We used self-stick
green felt from JBA International. Its products are sold in
catalogs and home centers. To locate a distributor, contact
JBA International, 114 Old Country Rd., Mineola, NY 11501;
(800) 741-0005.